Introduction:
The move away from traditional impermeable surfaces such as tarmacadam and asphalt (blacktop) has been given added impetus over the last few years by the emergence of reliable grid cell systems that offer low-cost, environmentally-friendly and, most importantly, completely permeable surfacing solutions for parking and access pavements.
This case study follows the installation of a cellular ground reinforcement system to a site near Doncaster. The paving system was supplied by a national manufacturer while the installation work was undertaken by Doncaster Council's Highways team.
The installation in the village of Stainforth , roughly 5 miles north-east of central Doncaster, was undertaken to provide safe, off-road parking for homes that are set-back from the main highway and separated from it by an open area of grass that provides recreational amenity for the local residents.
The existing layout featured a central access pathway surfaced with blacktop which linked a perimeter pathway to the public footpath. Local residents had taken to using the central pathway as access to the grassed area which was being used as an unofficial parking area for the properties which do not have driveways.
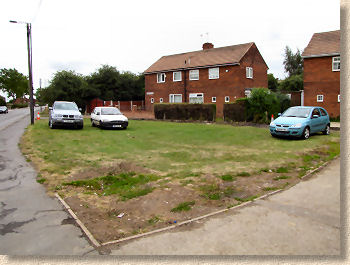
Neither the pathways nor the grassed area were originally designed to take vehicles, and so the council needed to provide vehicular access and parking to the houses but wished to retain both the amenity value of the area as well as the aesthetic appeal of a 'village green' look in front of the properties.
The Solution:
A grass-filled ground reinforcement system was the obvious answer, and after careful consideration and much discussion with the technical support section, a 50mm deep cell-tile that is ideally suited to sites that need to cope with regular trafficking by several light vehicles was chosen.
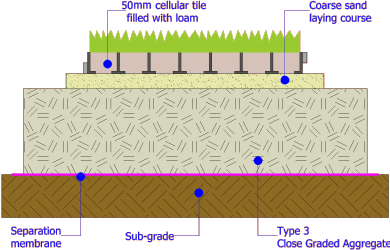
The Doncaster Highways team, working in conjunction with the technical support team, developed a suitable specification, which essentially comprised a highly permeable sub-base, a separation membrane, a laying course, the selected paver and a good quality free-draining loam blend that would be seeded on completion.
Construction:
Excavation:
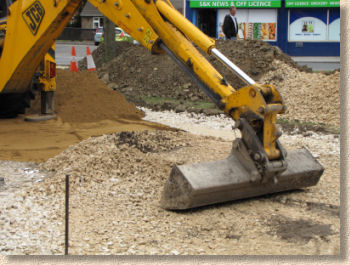
The area to be paved using the Ground Reinforcement Pavers was excavated and reduced to formation level . Topsoil was salvaged, but because its clayey nature meant it wasn't suitable for filling the cells when laid, it was carted off-site and used on other projects. The sub-soil was carted away and used as a general fill on other soft-landscaping projects.
Sub-base:
Once excavation was complete and any loose material had been compacted, a general purpose permeable non-woven separation membrane was laid over the ground to prevent the Close Graded Aggregate (CGA) which was to be used as a sub-base material from mixing with the underlying sub-grade .
The CGA sub-base used for this project is a 4-40mm crushed limestone (although a Type 3 material could also be used - see box opposite). The absence of any fine material (3mm or less) ensures it a highly permeable and exceptionally free-draining. This aggregate is used to ensure that the rootzone material and the laying course do not become saturated which would impede healthy growth of the grass covering and compromise its longevity. A free-draining rootzone encourages strong root growth as the grass covering searches for moisture, and it is the root growth that effectively knots together the whole structure.
Clause 805 Type 3

Too many sites where a grass-filled ground reinforcement scheme has been installed have failed because the rootzone has become overly wet, weakening the grass itself and reducing its potential for re-growth. A free draining sub-base is essential to maintaining healthy grass.

The sub-base should be levelled and thoroughly compacted to a tolerance of around ± 15mm as usual. Because ground-reinforcement systems are permeable, final surface levels are not as critical as they would be for an impermeable surfacing such as blacktop , and so a wider tolerance is permissible but it should be borne in mind that, when initially placed, the pavers should be reasonably level and follow smooth-looking planes if only for aesthetic reasons.
Laying Course:
Once the sub-base has been completed, the laying course can be placed. This comprises a sharp/coarse sand or grit of the type that might be used when laying block paving. As with the sub-base material, it is essential that this layer is relatively free-draining.
The laying course should be 30mm ±5mm thick and should be screeded to create an even bed for the cell-pavers. At this stage, the laying course should not be compacted as the base of the cell-pavers will need to bed into the laying course and so some 'give' in the material is required.
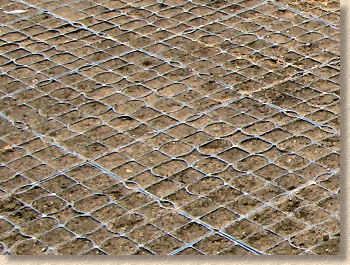
Laying the Pavers:
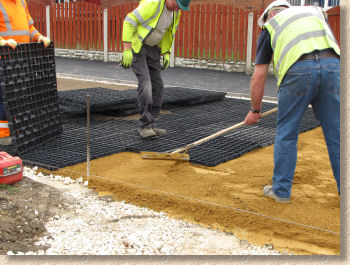
The pavers should be laid to straight lines, and so if no firm edge is present, a taut string line should be established to act as an alignment guide for placing the pavers onto the laying course.
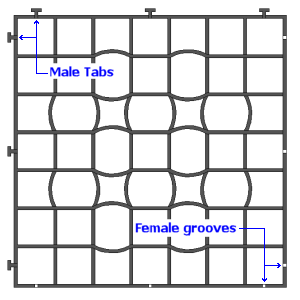
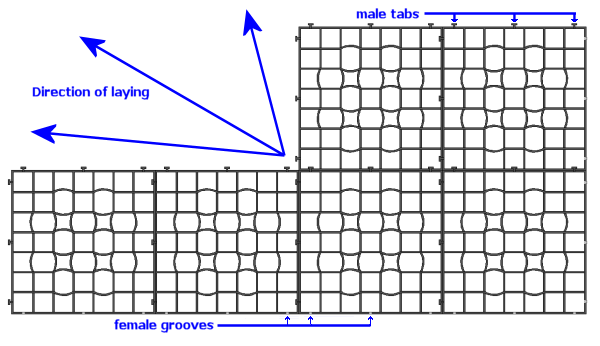
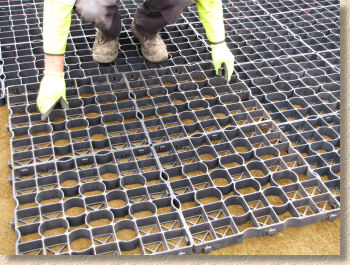
The cell pavers from the chosen system have interlocking tabs, with the male 'tongues on two adjacent edges complemented by female 'grooves' on the remaining two edges. Each paver should be laid so that the two male edges are facing the leading edges.
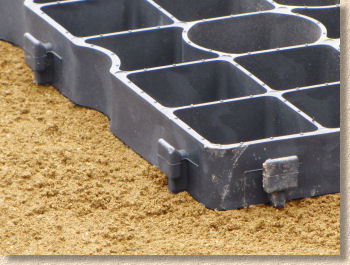
The pavers are laid in a defined direction: Male tabs always face outwards and laying proceeds along either or both of the male 'tabbed' faces.
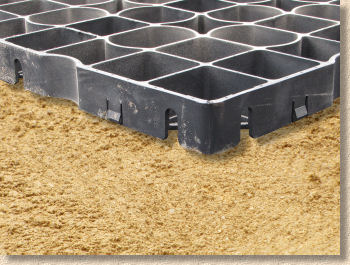
Each of these cell pavers measures 500x500mm and come supplied as pre-linked panels of 4 pavers measuring approximately 1m x 1m to facilitate handling and fast installation. The panels are supplied on non-returnable pallets, with 48 panels (48m²) per pallet, and each panel weighs approximately 6.4kg (1.6kg per paver). This particular cell paver is manufactured from 100% recycled LDPE, coloured black (although other colours are available to order) and provides approximately 96% open surface with cell walls measuring just 3mm, yet easily capable of withstanding the weight of a family car.
Unless working on a steep-ish gradient, there is no requirement to 'pin' the cell pavers. The open base beds into the laying course, which provides excellent anchorage, and this is then reinforced by the root systems once the grass starts to grow. On sites with noticeable gradients, it is best to seek technical advice from the technical support team and, if necessary, they can supply suitable anchor pins.
The Laying Process Step-by-Step
Cutting to shape:
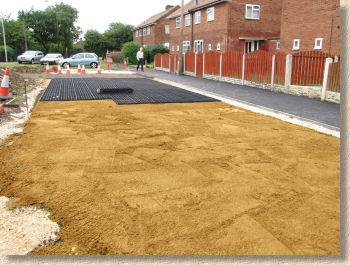
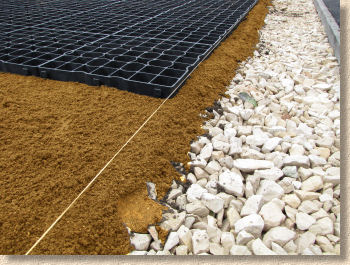
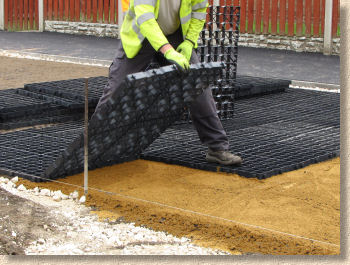
When fitting to awkward angles or around obstructions such as access covers, it's easiest to lay full panels to cover the obstruction and then to cut the pavers in-situ. On this project, the paved area turns through approximately 75° at one corner where it heads off towards the main road and so the pavers needed to be cut to a neat and reasonably accurate line. There is to be a 500mm gap between the edge of the cell pavers and the new blacktop footpath to accommodate a low fence that will separate the grassed parking area from the pedestrian-only footpath and prevent cars straying.
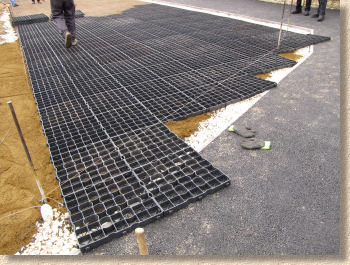
The pavers are laid to extend beyond the required area, and a string line is set up to establish the intended cut line.
A straightedge is then aligned with the taut string line and used as a firm guide for the cut-off saw which slices through the recycled plastic pavers with ease.
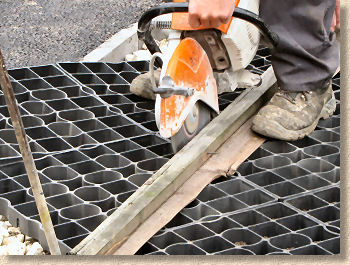
The pavers should be cut through 'full depth' so that the unwanted pieces can be easily lifted clear and disposed, leaving a neat and parallel edge at exactly the correct distance from the path edging to accommodate the eventual low fence.
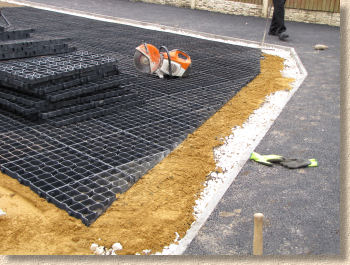
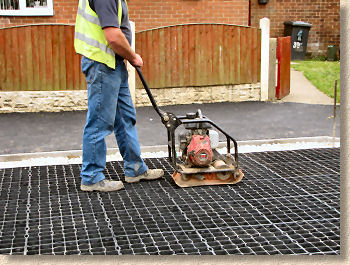
Compaction:
Once an area of pavers has been laid and any cutting or piecing-in that is required has been completed, the pavers should be compacted to bed them into the laying course which helps anchor them into position. One or two passes with a medium weight vibrating plate compactor is ideal.
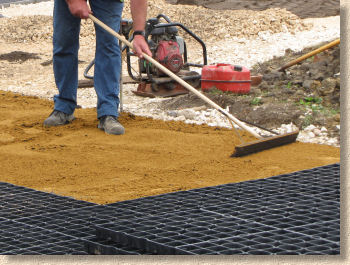
Filling:
Ground Reinforcement Cell Pavers are most commonly filled with either soil to allow grass to grow within the cells, or with a decorative aggregate. On this project, the requirement is to create an area that is capable of supporting family cars while still providing amenity for the local residents, so the plan is to fill the cells with soil and then to seed with grass.
As has already been mentioned, free drainage is essential for the growth of a healthy covering of grass. On some unsupervised jobs, unscrupulous contractors may fill the cells with 'as-dug' topsoil, or even subsoil, with no regard for its nutritional value to the grass or its drainage capabilities. The grass seed germinates, and so the contractor is paid, but is long gone some weeks later when it becomes apparent that the pavers are waterlogged and the grass is struggling to survive.
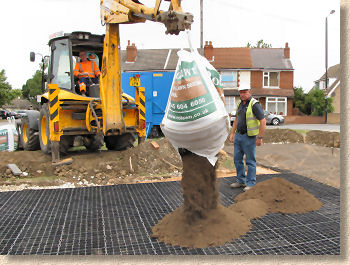
On this project, a high quality sieved loam (60:40 rootzone blend) has been specified to ensure it is capable of providing both firm anchorage and adequate nutrition for the grass, as well as being free-draining. Should a good quality, free-draining and friable topsoil be available, that too would be suitable, but if in doubt, bring in a specially prepared loam.
The loam is delivered to site in Bulk Bags, each holding around 750kg. Note that loam is much less dense than crushed stone and so each bulk bag weighs less than the same bag filled with, for example, gravel. The bags are slung from the back-acter of the excavator and craned into position over the installed cell pavers.
The base of the bag is sliced open using a sharp knife and the loam spills out. The excavator can slew the boom to help distribute the contents, but the bulk of the filling process needs to be done manually, using shovels, rakes, lutes or whatever seems most suitable on any particular job.
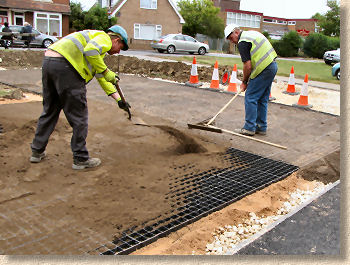
The loam is moved around the pavers filling each and every cell. On this project using the 50mm deep cell pavers, a single bulk bag (claiming to hold 1 tonne, but very unlikely!) covered and filled approximately 20m².
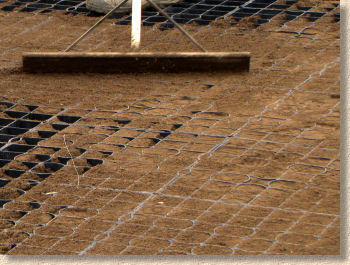
The cells are filled to the top, with any surplus or overfill scraped off and then it is left to gravity and the weather to settle the contents within each cell. After a week or two, the loam lies around 6mm or so below the top of the cells, which is ideal as it ensure the grass is growing from a surface slightly below the top of the cell walls and so escapes direct trafficking.
Alternative Fillings:
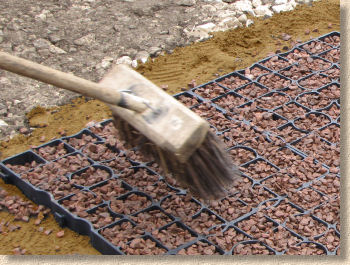
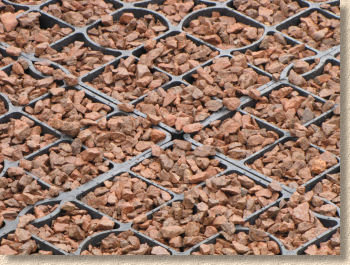
On this project the Ground Reinforcement Cell Pavers are filled with loam and will be seeded to grow grass, but the same installation technique can be used when the pavers are filled with a decorative aggregate or gravel.
A sub-base is installed, a laying course put down, the cell pavers laid and compacted into place and then the selected filling material is distributed over the surface. On a gravel fill project, installers will often use a stiff brush to help spread the aggregate over the paver surface.
Seeding:
Returning to the Doncaster project, once the pavers have been filled with the loam they are left for a few days to settle and then seeded using a specially selected grass blend which is rich in rye grasses that has been shown to be best suited to trafficked installations.
Typical seed mix for parking areas:
- 50% Perennial Ryegrass
- 20% Slender Creeping Red Fescue
- 25% Strong Creeping Red Fescue
- 5% Browntop Bent
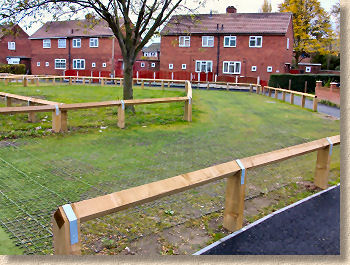
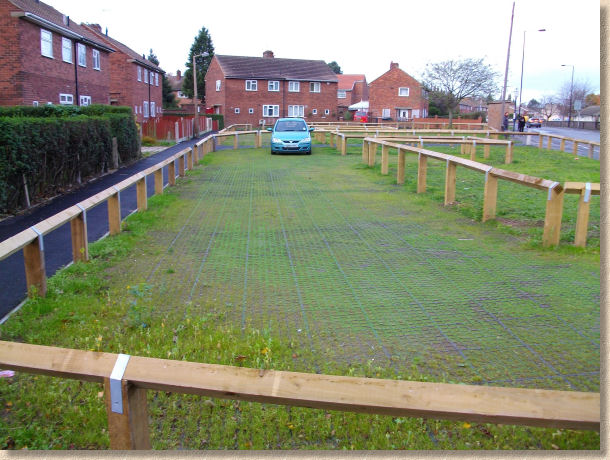
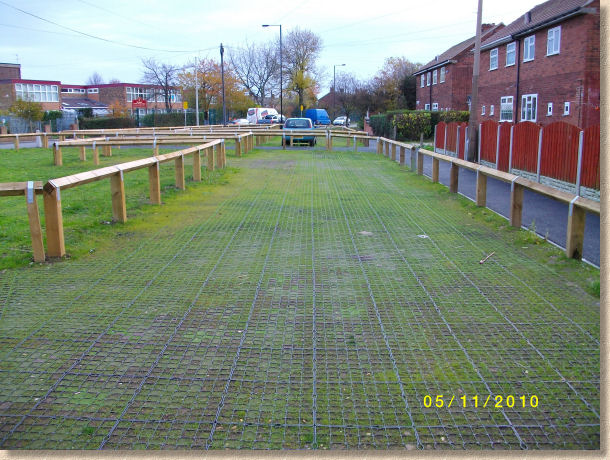
Completed Project:
Even those projects started at the height of what claims to be a British Summer need some time for the grass to colonise the new pavement. There's a definite green covering by mid-August, and by the end of the growing season the grass is fairly well established. The following photographs were taken in early November, some four months after the project was started....
Video:
Important: The previous sponsor of this video refused to honour their commitment to pay for the content and the promotion provided.
Any reference to the rogue company is unintentional - please think about their ethics and attitude to business agreements before considering the use of any of their products.
Uncannily similar products of equal or better quality are readily available from a variety of suppliers and manufacturers with a better moral code.