Introduction:
A screeded bed is typically established approximately 5 to 10mm high, and the pavings then compacted down to the required level.
For example, when laying 35mm thick flags, the screed level will be established at 27-30mm below finished paving level, leaving the paving 5-8mm high which is then tapped down to the correct level. For 60mm thick block paviors, the bedding layer will be established at 50-53mm below finished paving layer, resulting in the blocks being 7-10mm 'proud' to accommodate final compaction with a vibrating plate compactor.
It is not possible to state definitive values for how much a given thickness of bedding material will consolidate, as different materials compact to different degrees. Also, total bed thickness affects this 'compaction fraction', as does moisture content and other factors such as grain size, the strength of the laying operative, the weight of the maul, the size of the plate compactor, the type of paving being laid, etc.
The only accurate way to determine the compaction fraction for any given bed is by trial and error, but, as general guidance, uncompacted bedding usually compacts by 25-40%. So, to achieve a finished bed of 50mm thickness it may be necessary to start with an uncompacted bed of 70mm or so.
Here's a simple calculator that calculates the quantity of grit sand required to cover a known area at any given thickness.
Why use a laying course?
The laying course is a logical consequence of the 3,000+ year old principal of using progressively finer (ie:smaller) grain sizes as the upper surface of a pavement is reached. This gives structural integrity, which means a stronger, more interlocked, better performing pavement. This principal can be seen at play in almost every type of pavement construction, be it macadam , flags or resins .
However, for block paving , the smaller grain size of the laying course allows us to create a more accurate profile and so the final level of the blocks is more true. It's easier to achieve a ±3mm tolerance using a gritty sand with particles of 4mm or less than it would be using a relatively chunky crushed stone with particles up to 30mm or larger.
With the best will in the world, and even with years of experience, it's damned near impossible to achieve a tolerance of ±3mm using sub-base material in a reasonable time period, whereas it can be done in minutes using sand or grit.
There are other benefits to using an unbound (cement-free) laying course beneath modular paving: it aids drainage by allowing water reasonably unimpeded passage to the sub-layers, and it provides essential cushioning for the paving units. In particular, it's very good at accommodating the minor variations in block and flag depth that can occur with even the very best manufacturing techniques.
However, getting the right thickness is critical. There's a 'Goldilocks Zone': too much can lead to rutting, channelisation or unwanted movement, mainly because the smaller particles are more likely to behave like a fluid when saturated and under load, while anything less than 25mm runs the risk of not providing adequate cushioning and being awkward to prepare.
Years of research all over the world have refined the recommended thickness for an unbound laying course. The spec used to be 35-50mm but it's since been realised that there is less risk of rutting and other problems using a slightly shallower bed, so now the official spec is 25-40mm.
Principles
BS 7533 Part 3 (2005 Ed.) describes two alternative methods of preparing a screeded laying course:
- Pre-compacted
- Uncompacted
Pre-compacted
This is our preferred method, the one we have found to give fewest problems with settlement, and the easiest to undertake on site. The laying course material is spread in one layer, lightly compacted with only one or (at most) two passes of the vibrating plate, then screeded to a level that allows for final compaction of the paving units down to finished level. This process is described in more detail below .
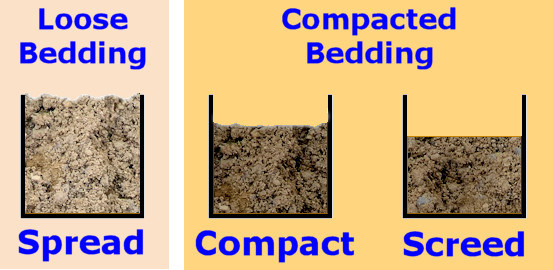
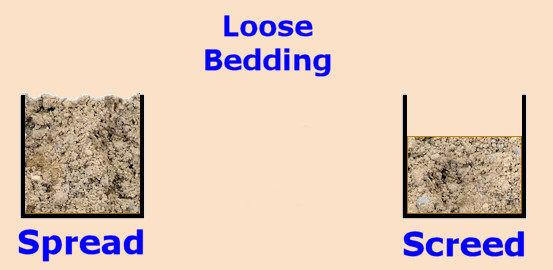
Uncompacted
The laying course material is spread and screeded to a level. The thickness of the bed, and therefore the level of the screeded surface, is determined (usually by extensive and time-consuming trial and error) to give the correct bed thickness once the blocks have been laid and the whole lot compacted.
Just why anyone would use this method is beyond us. It is a bloody nightmare! It rarely, if ever, gives a good finish; it takes at least an hour to determine just what thickness of uncompacted sand is needed to give a bed of regular thickness; it cannot compensate for deviations in the level of the base or sub-base; the sand, as mentioned in the description of the partial compaction method above, varies from place to place.
The only occasions when an uncompacted laying course has been successful is when it is laid by a paver machine over an accurately profiled sub-base or base, as happens with some machine-laid installations. Because the laying course material is evenly distributed by the machine, over an accurate sub-base (or base) and is not trafficked by operatives during its placement and screeding, a reasonably accurate bed is achieved. On manually prepared beds, the risk of creating differential compaction due to uneven distribution, or the material being walked over by operatives is too great, and therefore we cannot recommend this method of laying course preparation for hand-laid paving.
Partially compacted
In earlier editions of BS7533:3, a third method of screed preparation was described but has been dropped from the latest (2005 and 2009 +A1 ed.) editions because it is so bloody unreliable. However, a number of contractors (who really ought to know better) still use this method, so it is described below for reasons of completeness. Anyone using this method is most strongly advised to update their knowledge and switch to the much more reliable 'pre-compacted' method described above.
The laying course material is spread and levelled to the required depth below the finished paving level, and compacted. A further 15mm or so of loose laying course material is then spread over the first layer, and screeded to level. The paving units are laid directly onto this uncompacted layer.
The major drawback with this method is that the laying gang have to work the area twice: once for the compacted layer and once for the loose layer, whereas the pre-compacted method enables a bed to be prepared in one.
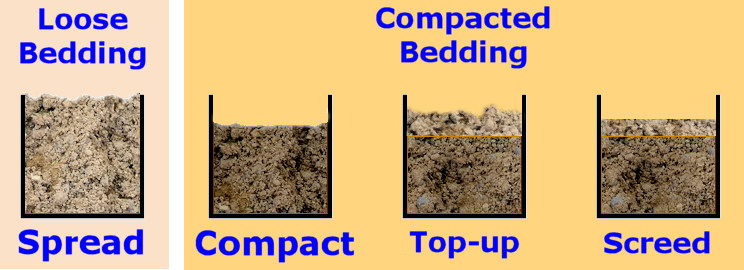
Also, we find that the loose layer compacts differently, depending on moisture content and grain density. One patch at 15mm thick may compact to, say, 9mm, but an adjacent patch that may be slightly damper, or more compact, will consolidate to, say, 12mm thick.
The Preferred Method - Pre-compaction
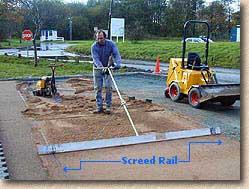
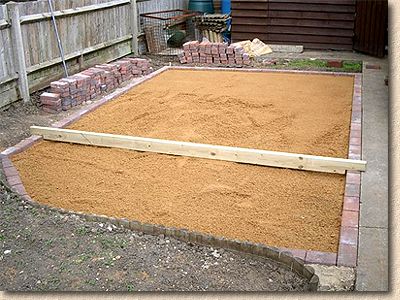
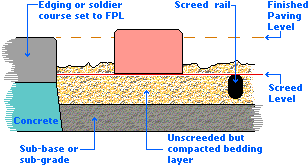
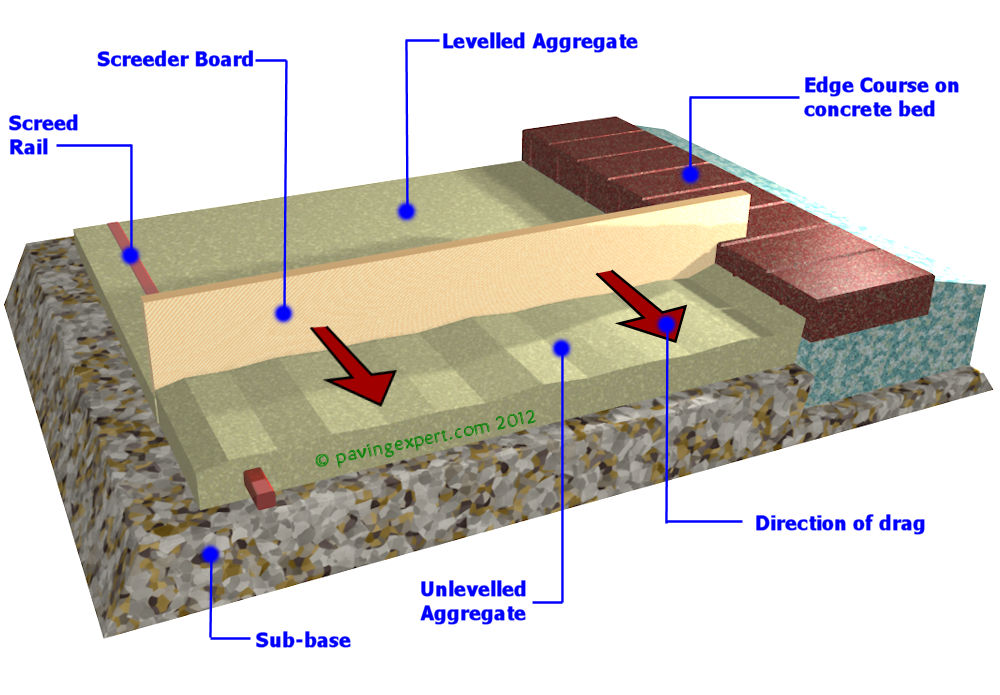
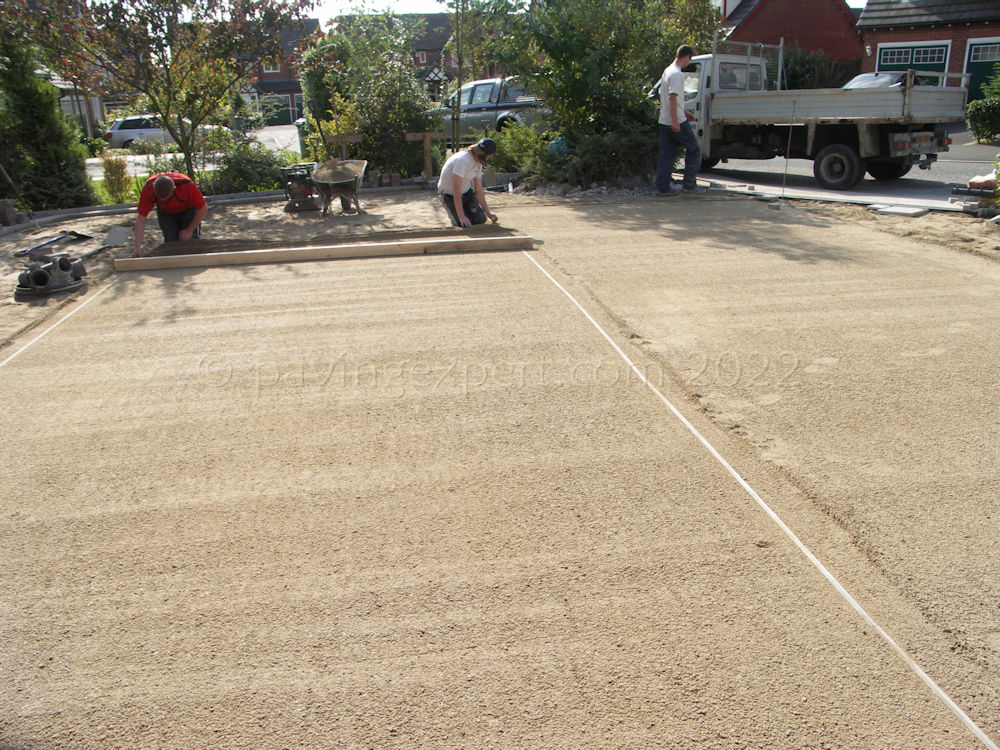
If an edge course is being used, this should be constructed to the correct levels prior to the screeding operation. The edge course can then be used to help establish a screed level. However, on larger areas, parts of the screeded bed can be some distance from the nearest edging, and so 'Trammel Bars' or 'Screed Rails' are used to ensure the bed is established at the correct level.
To construct a screeded laying course, the bedding material should be spread quite generously over the area to be screeded, and evened out with a shovel or a rake so that it is 30-50mm higher than the level required.
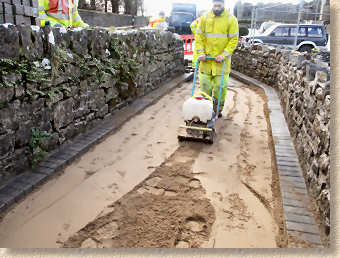
This material is then lightly compacted by one or two passes with a vibrating plate compactor, or stamped down with the feet. A thoroughly compacted bedding layer is not required at this stage, as there needs to be some 'give' in this bedding layer, to allow final compaction of the paving to the correct level.
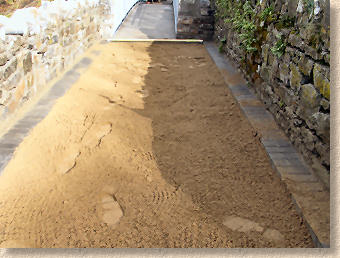
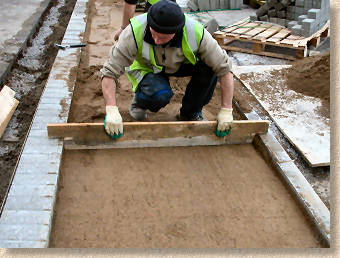
The final stage is the actual screeding process itself, which involves dragging a screed board over the partially-compacted laying course material and 'scraping-off' the top layer to create a smooth, profiled laying surface at just the right depth to accommodate the paving.
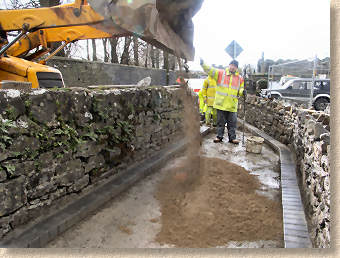
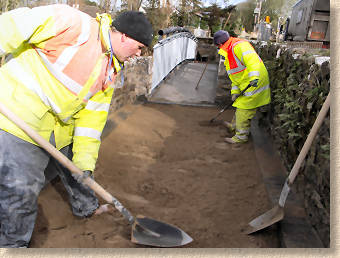
Although the photograph opposite shows two operatives drawing the screeder board, it is not uncommon for there to be just one man, with an assistant removing excess material that collects at the rear of the board. While one man can successfully draw a screeder board of up to around 2 metres, any screeder board longer than around 1.8 metres will be much easier to draw if two operatives are used, one at each end, working in tandem.
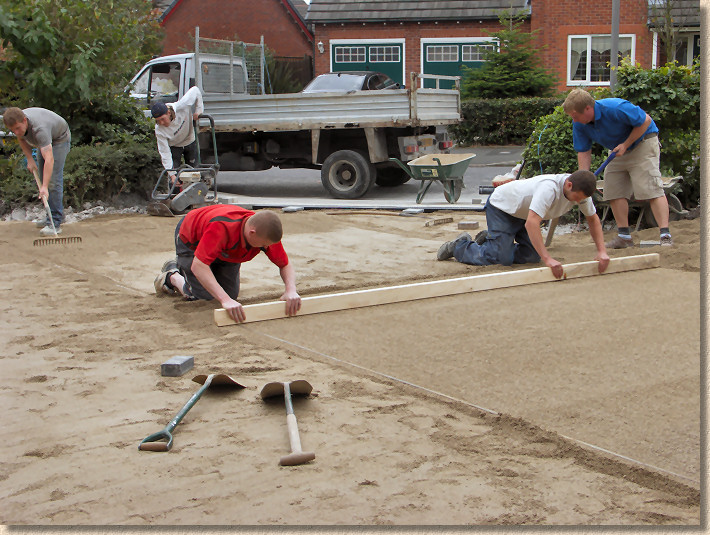
From L to R - one man rakes out the sand to a rough level while a second uses the vibrating plate to compact.
Two men draw the screeder board over the screed rails, scraping off the excess and reducing the sand to the required level, while a fifth man works with a shovel to remove excess sand as it builds up in front of the screeder board.
The Tools
... for contractors
Contractors are required to prepare screeded laying courses more or less every day, and so they tend to rely on specialist screeding aids which would probably be beyond the budget of most diy'ers, as they are not a tool they are likely to use time and time again.
Probst Handling Ltd. provide an unrivalled range of high-quality screeding tools, including the EP System, which comes in a range of sizes from 700mm wide for "touching-up" jobs and smaller areas, up to the 2500mm wide model shown opposite which is designed for larger areas.
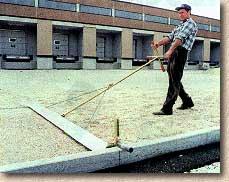
These tools are specifically designed for manual screeding, and can be adjusted to ride on top of screed rails, as shown above, or along the top surface of a kerb, edging or soldier course, as shown opposite, so one tool can be used in almost every situation.
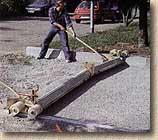
They benefit from carefully considered features, such as the cross-shaped handle that makes dragging the tool that much easier, and they are operated from an upright position, thereby eliminating one of the curses of the trade, Screeder's Knee, a dull ache in the joint brought on by extended kneeling in damp sand.
Hinged or jointed screeding bars, as shown on the right, are a handy piece of kit for those gangs undertaking a lot of cambered or dished work. The centre joint can be set to a variety of angles to accommodate raised profiles (roof-section or cambered), or dished (pan-section) profiles as the job warrants.
While such a tool is ideal for constant width pavements, it is sometimes quicker to use a standard straight screeding tool with screed rails to create more complex cambers and dishes.
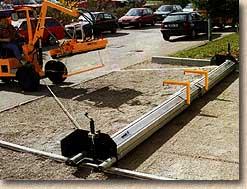
For larger jobs, a machine-mounted screeding bar or bucket, such as that on the left, is often preferred, as it allows one operator to prepare a considerable area in a relatively short time, increasing productivity of the laying gang. They also tend to be significantly bigger than the manually operated versions, up to 7 metres in length. However, such a system needs to have the room to manoeuvre or they can be more trouble than they are worth. They are better suited to car parks, commercial yards and freight-handling areas, rather than residential driveways.
Again, some time needs to be spent establishing trammel bars or edgings to guide the screed board, and there will probably be some sections that will still require manual screeding or titivating with a bull-float, but these systems do provide a valuable service on large pavements.
... for smaller jobs and diy
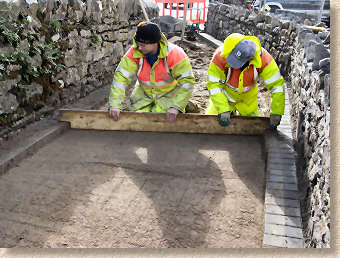
The purpose-designed screeders are all well and good for us professionals, but for most DIY projects or smaller jobs, a straight-edged length of timber is easier to manipulate, and much more cost-effective. 100x19mm is a good sized board to work with, and the timber should not be more than 3m in length, as longer lengths can be hard to drag, single-handed, and are more prone to bending and sagging, leading to incorrect level formation.

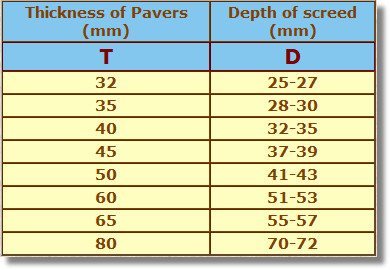
If using an edge course or kerb to guide the screeding level, cut a notch out of the end of the timber, as shown in the diagram opposite. The depth of the notch is determined by the thickness of paver being used; guide values are given in Table 1 below.

 .
.
Establishing screed rails
Where there is no kerb, edging or soldier course from which to work, a screed rail or trammel bar should be established in the bedding material at the required level as described below. See the table above for details on recommended screeding levels for various thicknesses of paving.
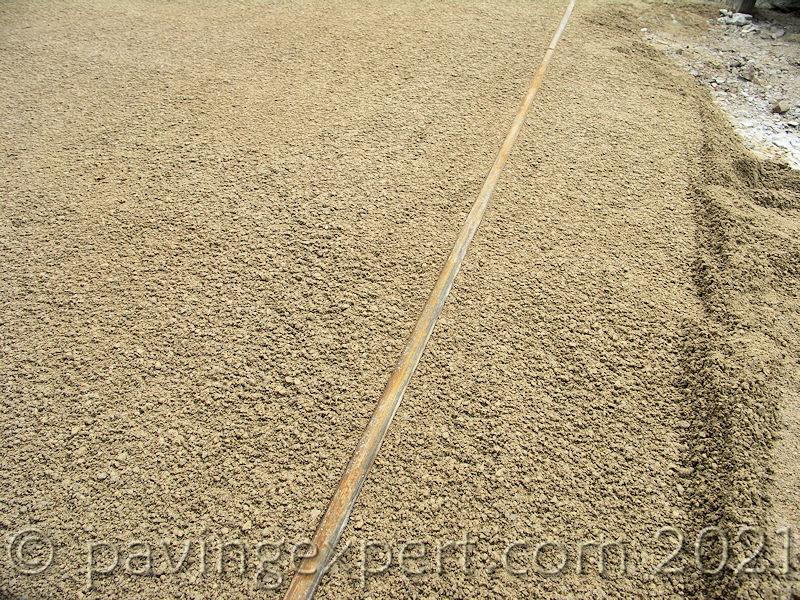
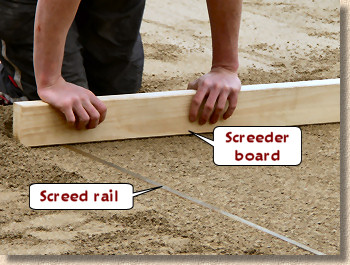
A screed rail is a long, straight rod or length of timber, usually 3 to 4.5 metres in length.Some types can be interlocked to create longer runs, but for most contractors, simply abutting or overlapping adjacent rails is adequate.
All kinds of items are used as screed rails or trammel bars; 20mm diameter steel conduit is probably the most popular choice, as it's robust, re-usable and cheap, but aluminium I-beams or box section, roadform sections, or lengths of 75x50mm timber are all regularly used by contractors throughout the land. As long as the chosen 'rail' is convenient, fairly smooth, and, most importantly, absolutely straight, almost anything can be used.
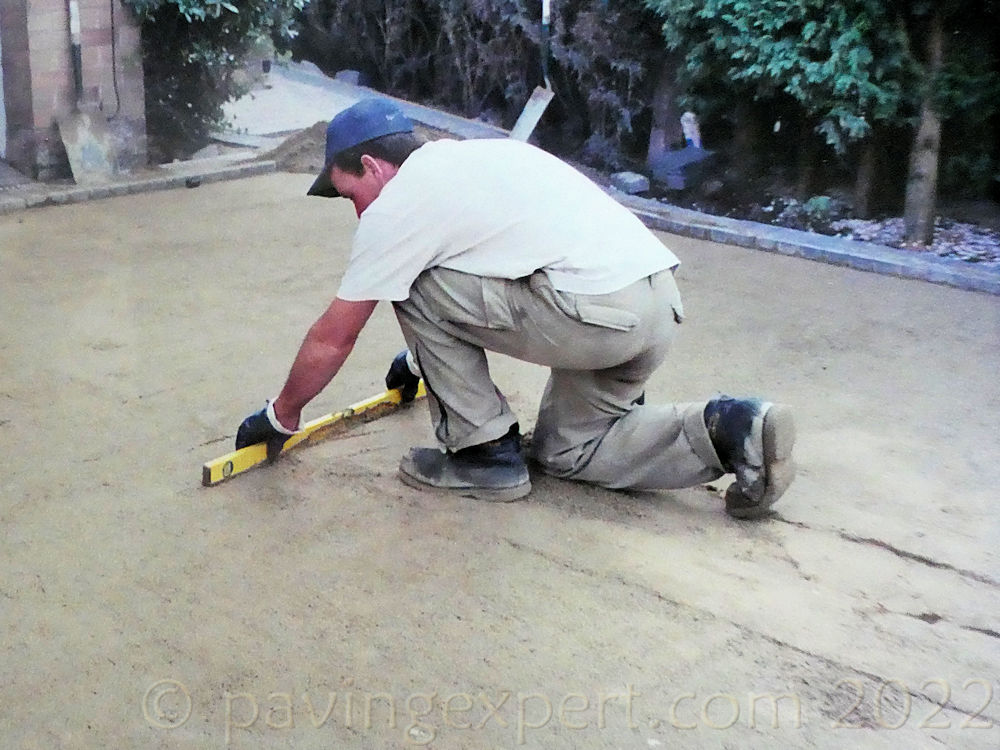
The screed rail is established within the bedding layer and set in such a way that its top surface is at the level required for the surface of the screeded bed. Some rails are simply bedded into the laying course material, while others may be set atop bricks or other padstones, or carried on steel pins. The most important factor is that, once established, the rail should not move, settle or sag when the screed board is dragged over it, yet must be capable of being removed prior to laying of the paving course.
The level of the screed rail is determined by the compactibility of the laying course material and the thickness of the chosen paving. Table 1 above gives some average values for a typical zone 2 sand bed at 35mm thickness, but other sands or other bed thicknesses may yield different results.
Only on-site trials can determine the actual compaction values for each project, and therefore this must be determined before a screeded bedding layer can be prepared.
This is normally achieved by constructing a small area of paving, relying on experience to 'guesstimate' the screeded bed level, and then checking that final compaction of the paved surface hammers down the paving units to the desired level. If the paving units refuse to settle down to the required level, or finish up lower than the required level, the screeded bed level must be adjusted up or down accordingly. Remember that for most segmental paving, such as blocks or flags, the finished paving level should be within ± 3mm of the desired level, so there is some leeway.
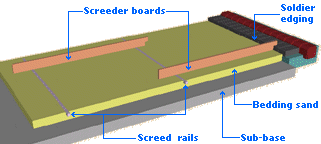
The level of the screeded bed has been determined and therefore the screed rails can now be established. These are typically positioned in such a way that the screed board will span from rail to rail or edging to rail, with some overlap, usually 100-300mm, and are always aligned in the direction in which the screeding action will take place.
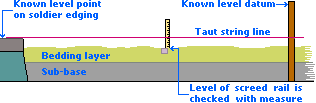
Once the rails are in position and aligned, their level is set by checking against a taut string line stretched between two known level points, by using boning rods , or by means of an automatic level . It is essential that the rails are firmly established - should they move after establishment, the whole screeded bed could be at an incorrect level which in turn, could result in the finished pavement needing to be re-laid.
Cambers and dishes
Note that it is possible to create cambered or dished profiles with the aid of screed rails. By establishing the rails above or below the intermediate level determined by stretching a taut string line between to known points, as illustrated above, a camber or dish of known proportions can be created. On larger pavements, a series of rails can be established to create a dish or camber with a span of 10 metres or more.
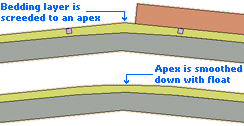
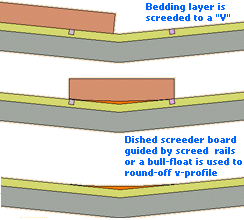
For cambered profiles, the screed rail is often established at an apex which is subsequently smoothed off by screeding with a shorter screeder board or a bull float. In some instances, a pair of rails is used, as illustrated opposite.
Dished profiles are constructed using a similar process where the rounded dish profile is created by manually re-screeding with a short, straight screed board or bull-float, although some contractors use a specially shaped screeder board to create the dish.
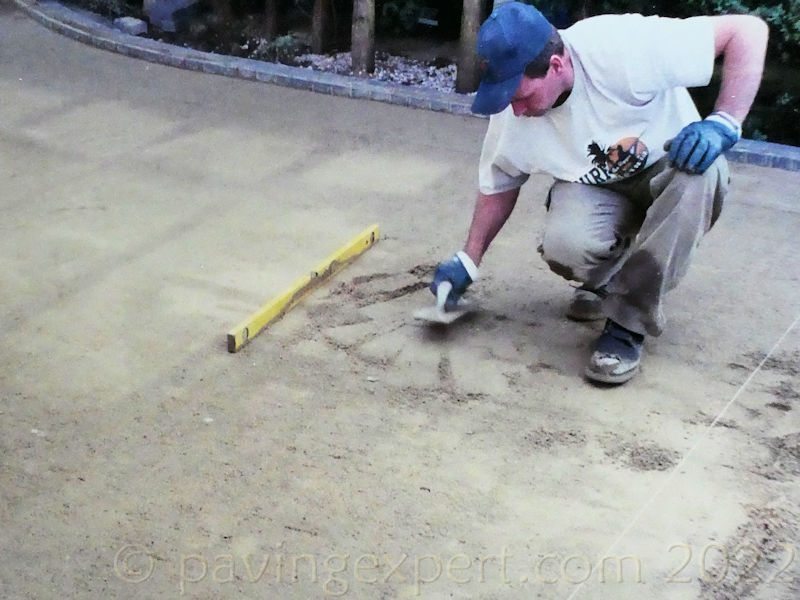
The screeding process
Once any necessary screed rails are positioned, the screeding itself can be done. The screeder board is dragged in one direction, making sure the bottom edge of the notches, or the bottom edges of the screeder board itself are kept in contact with the top of the rail or edging at all times.
Short screeder boards can usually be managed by a single operative, but larger boards are best used by two operatives, one at each end (durrr!). Often, a gentle transverse (side-to-side) sawing motion of the screeder board will help its accurate passage through the bedding layer material, scraping off the excess sand as it moves along.
Should the weight of scraped-off bedding material in front of the screeder board become excessive, it can be carefully removed with a trowel or spade and moved out of the working area, thereby reducing the 'weight' at the front of the board to a manageable amount. When removing surplus sand, care needs to be taken in order not to disturb the compacted material beneath the screeder,.
And the Golden Rule of preparing a screed: DO NOT traffic the area that has been screeded, not even to just walk across it to get a trowel. This can cause differential compaction, and problems with finished paving levels.
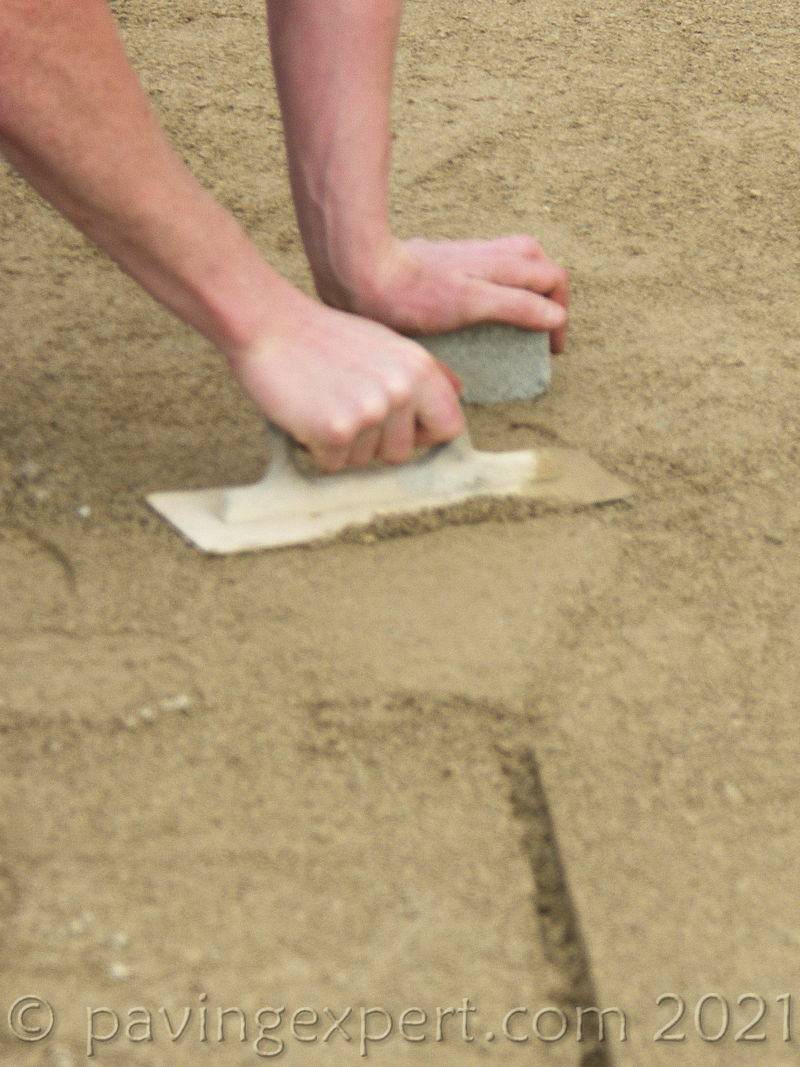
Final titivating
With straightforward screeded bedding layers, once the screed has been prepared, the paving can be laid, but with most projects, some 'tidying-up' work or 'titivating' is necessary to complete the preparation.
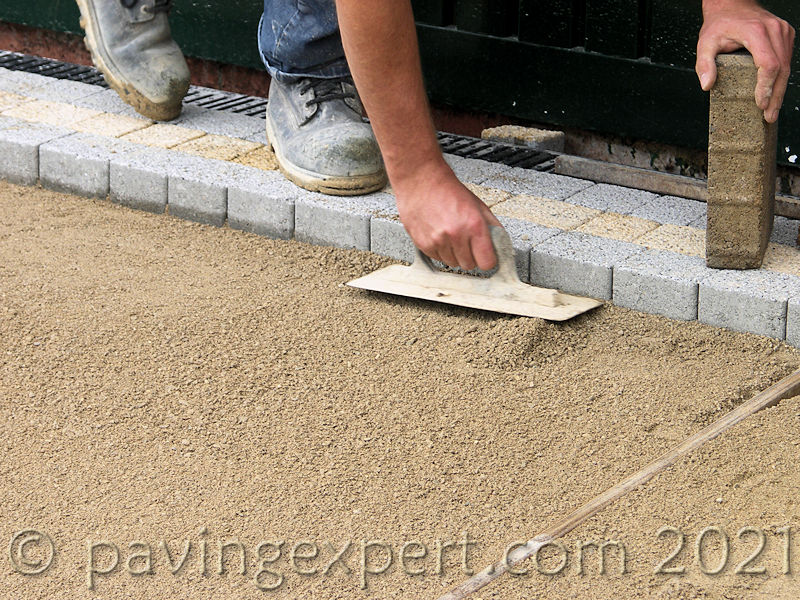
When a kerb or edge course has been used to guide a screeder board, there is often a surplus of bedding material alongside the edge blocks. This can be re-screeded with a short screeder board or simply removed with a bull-float or trowel. The same is true for 'obstructions' within a screeded area, such as manholes, gullies, lighting columns, bollards etc. If possible, it's best to undertake this titivation as the screeding progresses, to avoid having to walk across the screeded bedding layer once complete.
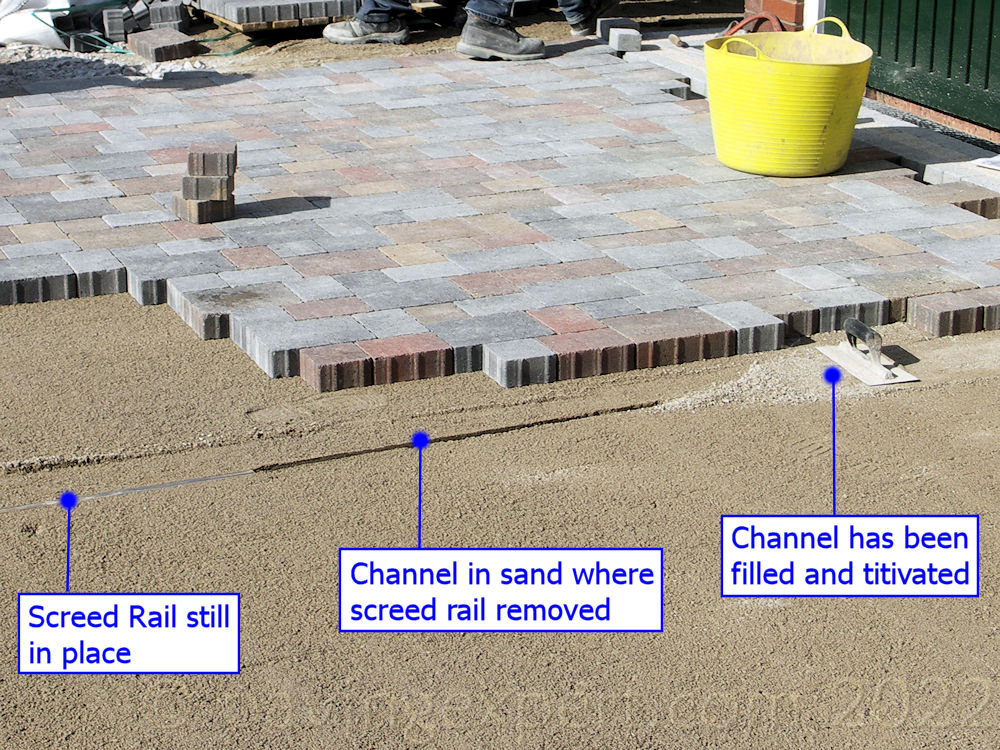
When manually screening a large area of laying course in preparation for paver placement, it often becomes necessary to make several “lanes” of adjacent screeded aggregate due to the limit on lengths/widths of manageable screeder bars, and/or the need to create summits or valleys within the laying course. When using embedded screed rails, how can the laying course be “made good” once the rail itself is removed?
There are two main methodologies followed: working up to the rail; and stripping rails prior to laying.
The first methodology is simple but limits how much paving can be laid without an enforced stop to titivate the recessed channel left by the removed screed rail. The second method removes the rails before blocks (or flags/slabs/setts/etc.) are laid and while it can be a little more awkward for some installers, it does have the benefit of allowing full width laying with no enforced breaks, which in turn enables proper checking or coursing and alignment, rather than the piecemeal approach that has to be employed with the “lay to rail” method.
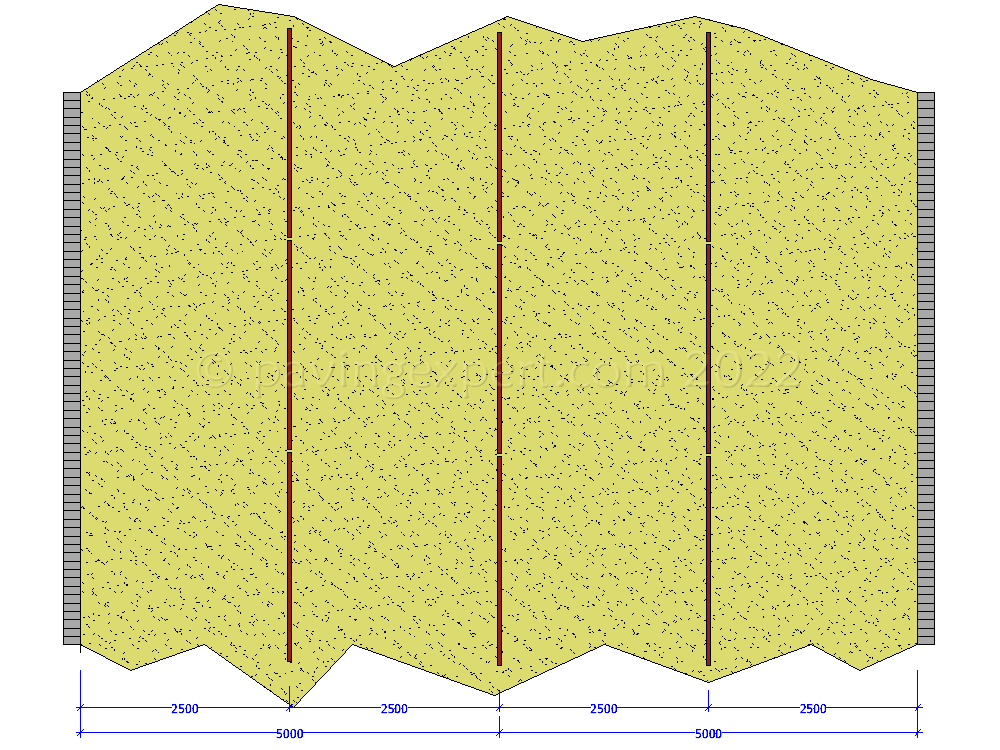
The area to be screeded for paving is divided into appropriate widths and screed rails set at appropriate separations. So, for example, a 10m wide area of paving which already has its edge courses in place may be divided with rails placed at 2.5m from the left hand edge, another rail in the centre on the 5m line, and then a final rail at 2.5m from the right hand edge.
Lay to Rail:
Each lane is screeded. The installer may choose to screed all four lanes as one task and leave the rails in place, or they may prefer to screed Lane 1, place the pavers to as close to the screed rail as possible, then screed Lane 2 before removing the first rail and making good or “titivating” the laying course using floats and short screeder boards.
The advantage is that the titivating is done from the paved area. No need to step onto the prepared laying course: all the necessary work is carried out while standing, sitting or, in some cases, lying on the laid paving.
Care is required to keep as far away from that free edge as possible to avoid disturbing any of the laid pavers. Any blocks or flags that are nudged, unsettled or disturbed in any way must be lifted and re-laid before continuing.
Remove Rails in Advance:
As with the Lay To Rail method, each lane screeded, but before any paver placement commences, the rails are lifted from one end, removing them completely from the laying course. Where multiple rails have been laid consecutively to cover a longer area, those rails not reachable from the accessible ends are removed by *very carefully* walking along the channel formed where the first rail was removed until the next rail can be reached and removed. This continues until all rails are removed.
The channel and the adjacent area of laying course that will have been disturbed by removing the rails is now titivated, by placing additional laying course aggregate, compacting it by trampling or light pummelling, and then levelling it off using floats and short screeder boards.
The key to success is to keep the inevitable disturbance to the laying course to an absolute minimum. The titivating operative needs to keep their feet on or as close to that original channel as possible, and to work their way out, usually backwards, making good as they retreat.
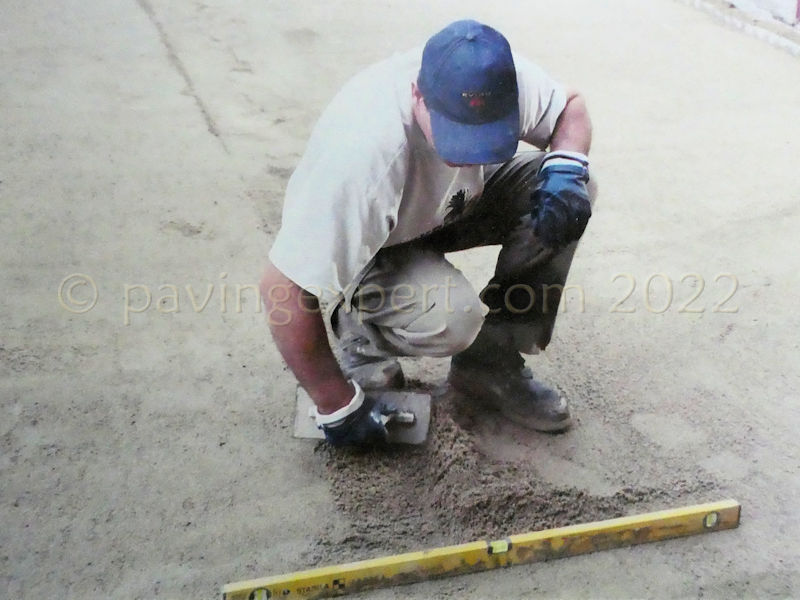
Final Checks:
The final bit of titivating is to visually check the screed. This may involve lying flat on the ground, getting the eye as close to screed level as is possible and checking for high-spots and hollows. Any defects in the screeded laying course should be corrected at this stage, before they impinge upon the pavement itself. Some of the long-handled screeder boards allow lumps and bumps to be rectified without stepping onto the screeded area, but in other areas, there may be no viable alternative other than to send an operative onto the screeded bed to rectify a defect. In such cases, the operative should endeavour to make a single track onto and out of the screeded area. Once the necessary rectification is complete, the operative should work backwards, retreating off the screeded bed, levelling out footprints and other disturbance in their wake.
Once an area is prepared in this way, the pavers or flags can be laid directly onto the screeded bed. Work should always be carried out from the paved area, not from the screeded bed, with tools and materials moved along as work progresses.