Introduction:
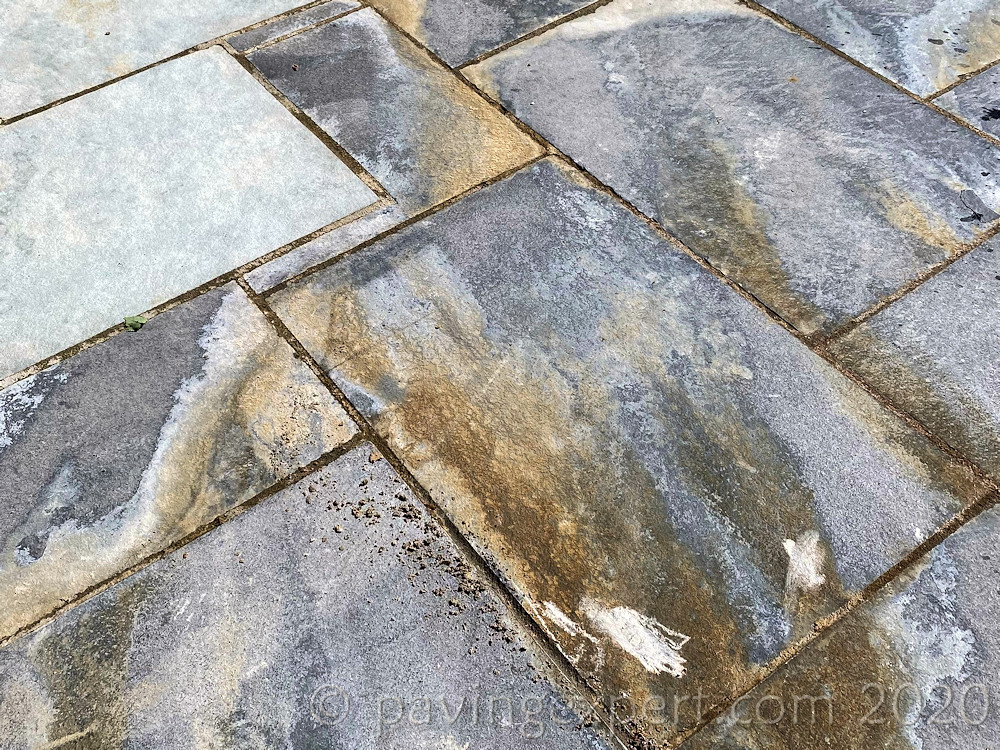
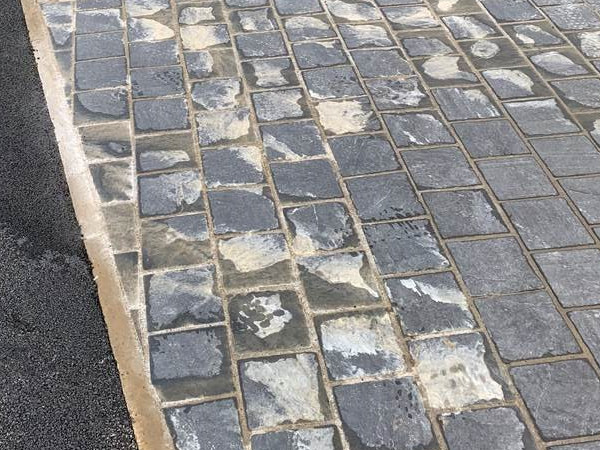
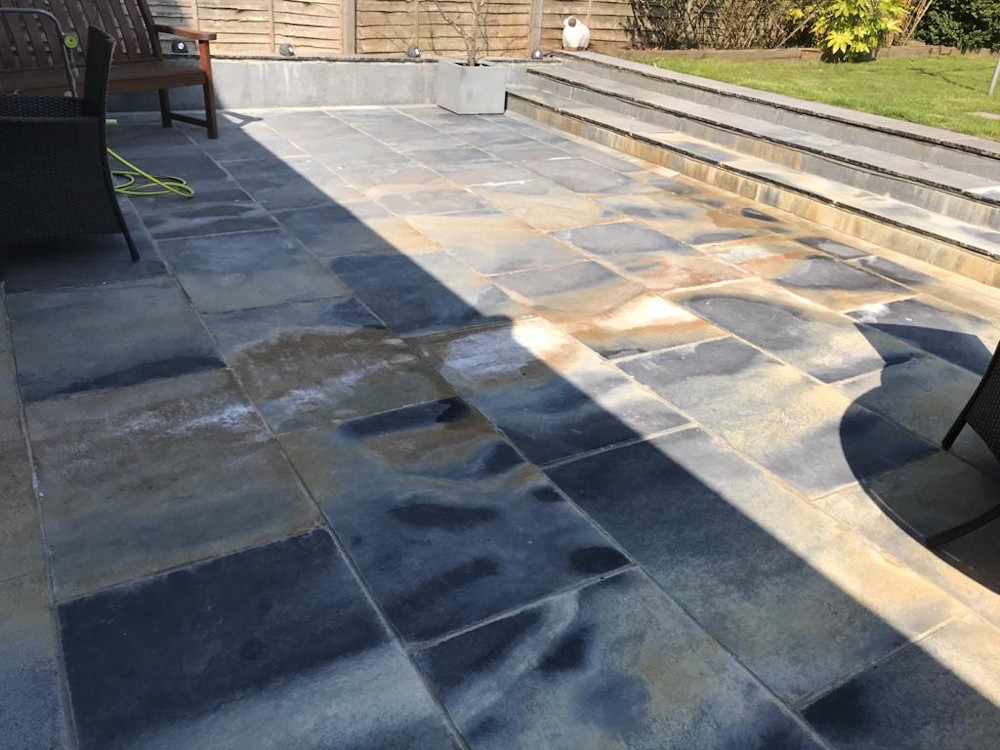
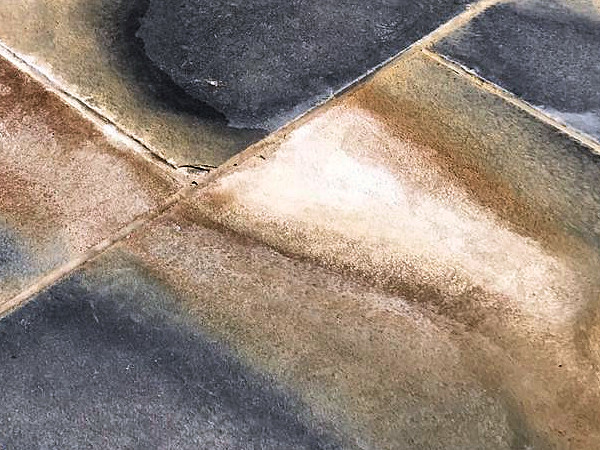
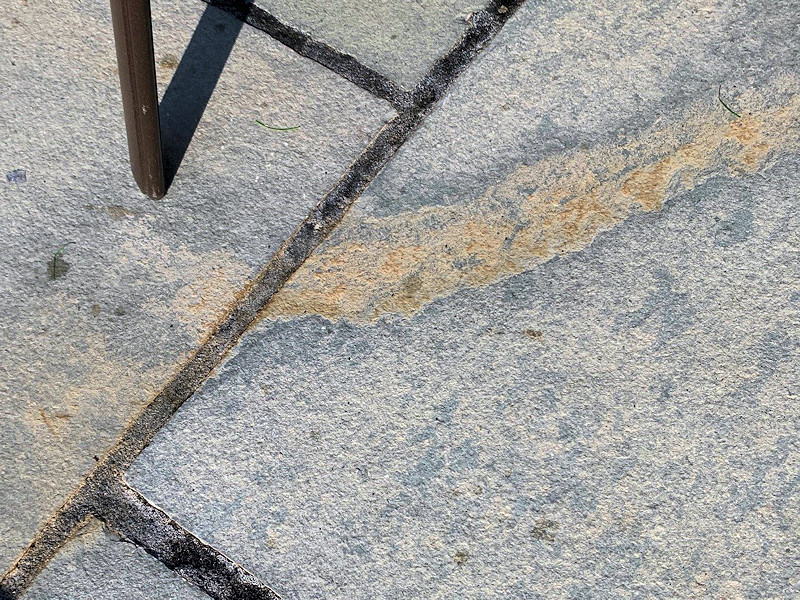
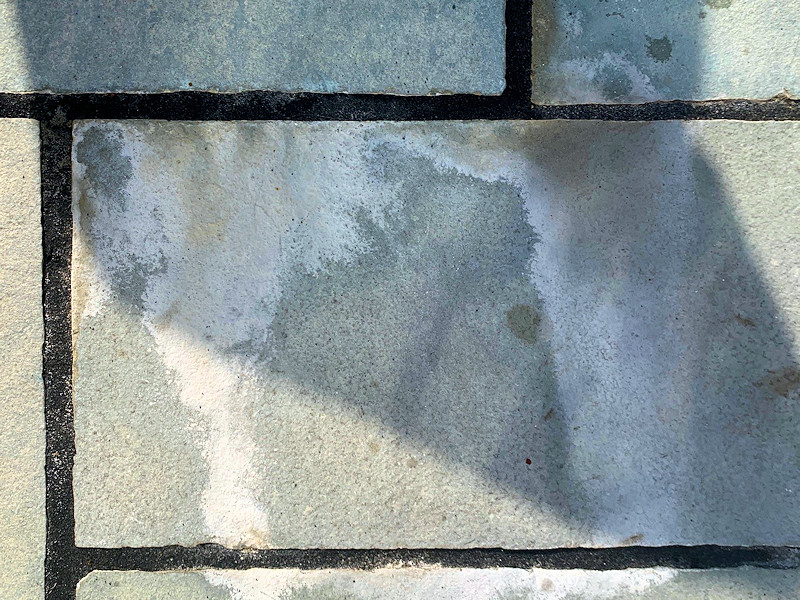
Over recent years, a number of property owners have questioned the mysterious appearance of a stain or sediment on their paving a few weeks or months after installation. Sometimes described as weeping or oozing and leaving a ‘deposit’ or a ‘scum’ on the surface, it is often light coloured, occasionally rusty, and usually difficult to remove, being a hard, almost cement-like substance that usually emanates from the joints in one or two places on the paved area.
The question usually come in two parts: what is it; and how to get rid of it?
What is it?
It’s a reasonably common problem caused by leachate from the bedding rising to the surface and then being deposited as a surface ‘scum’ when the water content evaporates. It does seem to happen more often with permeable jointing mortars, but there are dozens, possibly hundreds, of cases where it has happened with standard sand/cement mortars.
It most often appears when there has been no provision for adequate drainage of the sub-layers when a new paved area is constructed. The growth in use of permeable mortars, particularly the one-part ‘polymeric’ brush-in mortars for jointing, over recent years has undoubtedly contributed to the number of reported incidents, but it is a phenomenon I recall seeing in the 1960s and 1970s, long before the advent of these ‘modern’ materials.
The underlying cause is hydrostatic pressure from groundwater seeking to find an outlet. Trapped beneath a newly-paved area, it finds the permeable joints and oozes its way out, but in the process it collects minerals from the sub-layers, particularly the bedding, which then get deposited on the surface of the paving as escaped groundwater slowly evaporates.
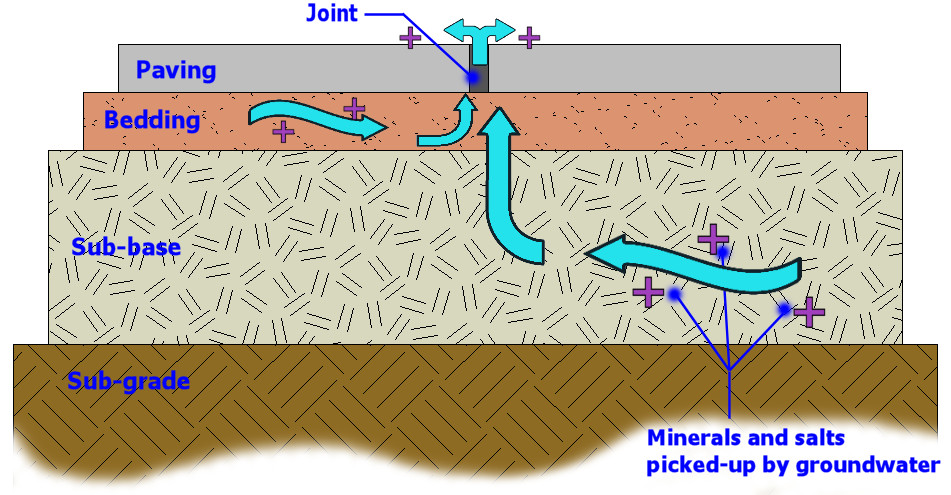
Many sub-base materials will contain some mineral content that is soluble and the worst culprit is any limestone or limestone-based aggregate, which would include dolomite, chalk and, in this age of recycled everything, crushed concrete (the cement content is made from…..limestone!) The same applies to bedding materials which will typically contain some cement content, and, as already stated, the source of cement is limestone, rich in soluble Calcium Carbonate.
In a process that is essentially the same as that which forms stalactites in caves, the groundwater, being slightly acidic due to the natural rainfall in Britain and Ireland being that way (pH 6.5 to 7, typically), dissolves the calcium carbonate minerals (from the limestone) as it passes through the sub-base and the bedding and carries it in solution. It will often pick up other minerals, too, notably other carbonates, such as magnesium-rich dolomite and iron-rich siderite, along with Calcium Sulphate (better known as Gypsum) and possibly several other trace minerals.
Why it appears:
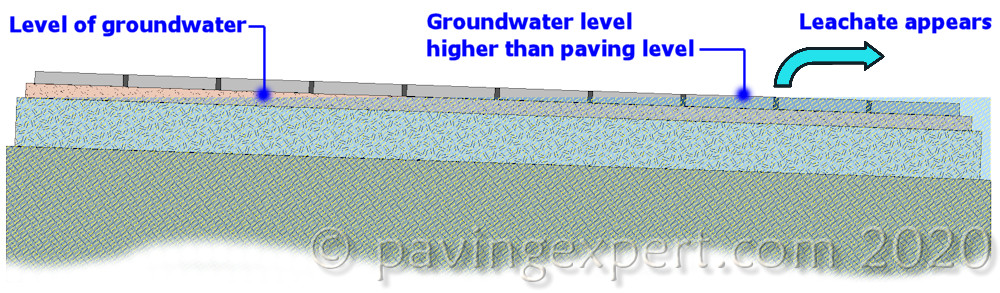
On many sites, the level of the groundwater (the Water Table) lies well below the construction layers of a pavement and any mineral content from the bedding or sub-base will be borne downwards, into the subgrade where it can do no real harm. However, on sites with a heavy clay sub-soil/sub-grade, migration of ground water can be impeded and this can result in groundwater ‘lurking’ within the build-up layers, taking a relatively long time to find its way down into the sub-grade below.
At times of prolonged wet weather, the level of the groundwater within the construction layers can rise to a point where it is at or even above the paving level.
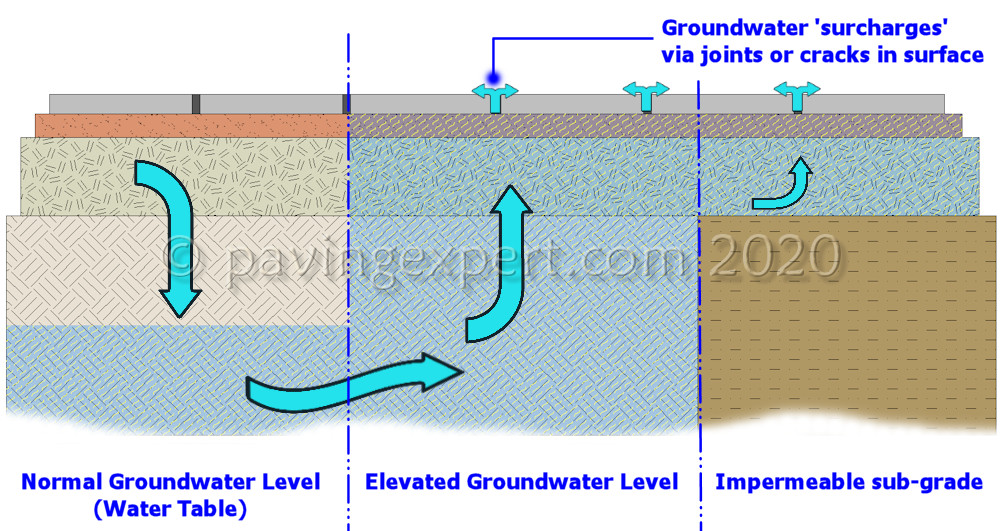
When there is no other easy escape route, the pressure from the accumulated groundwater pushes it up and out via ‘weak spots’ in the pavement surface, such as permeable joints or even through cracks in seemingly impermeable mortar joints. It may also emerge where two materials meet, such as an area of solid paving abutting a wall.
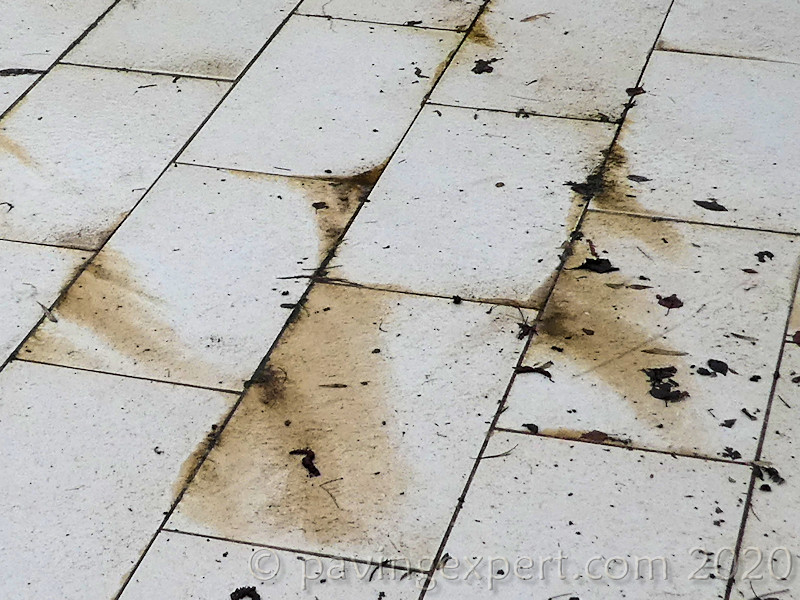
Water oozes out of the weak spot – it is rarely more than that although it is sometimes an identifiable ‘trickle’ and continues its journey ‘above ground’ across the surface of the paving. As it travels, it loses its mineral load, partly through evaporation of water from the paved surface, partly due to natural deposition of similar minerals with those for which they have an affinity, and slowly, slowly, a visible deposit begins to accrue. It can take a few weeks for it to be noticed, or even months – it all depends on the rate of groundwater flow and the mineral load it carries.
Eventually, and especially on darker pavings, it becomes highly apparent and it’s usually at this point that someone emails this website looking for a remedy.
Where it’s more likely:
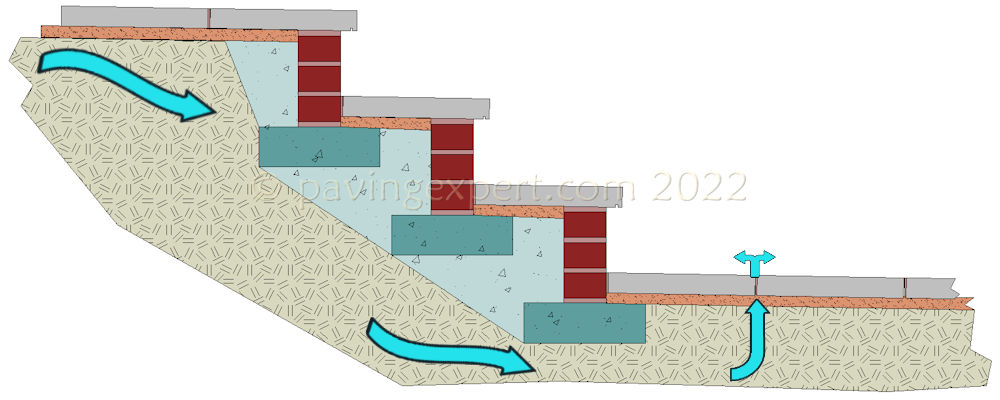
The source of the groundwater varies from site to site, but two of the more commonly observed scenarios involve properties with a large paved area (>100m²) laid to a gentle slope, where the leachate appears at a low point on the paving, or those properties where an area of garden lies at a level higher than that of the paved area. When such sites are considered as cross-sections, it rapidly becomes clear why the issue has arisen.
Prevention is better than cure:
From an engineering point of view, these scenarios are highly annoying because they should be apparent to any competent paving installer during the initial site survey. They are so easy to remedy *before* there is any chance for damage to be done, and the cost of the ‘fix’ is quite minimal, relative to the overall cost of paving.

Where there is higher ground adjacent to a paved area, some form of interceptor drain positioned lower than the paving level will prevent groundwater building to a level that might threaten to ‘overflow’ onto the paving.
On more open areas, some form of sub-surface drainage will be required. This might be a simple perforated land drain at, say, 2m centres at the boundary between sub-grade and sub-base, or sections of suitable drainage composite laid in a similar manner. These would need an outlet, which could be a nearby SW system, if one is available, or it may be possible to direct to a soakaway or other SUDS installation.
In all cases, they key to success is the provision of some method of collecting excess water from the pavement sub-layers and diverting it to somewhere less vulnerable. This will prevent it building-up to the point where it surcharges or oozes out of the pavement itself, leaving its accumulated minerals, salts and suspended solids in its wake.
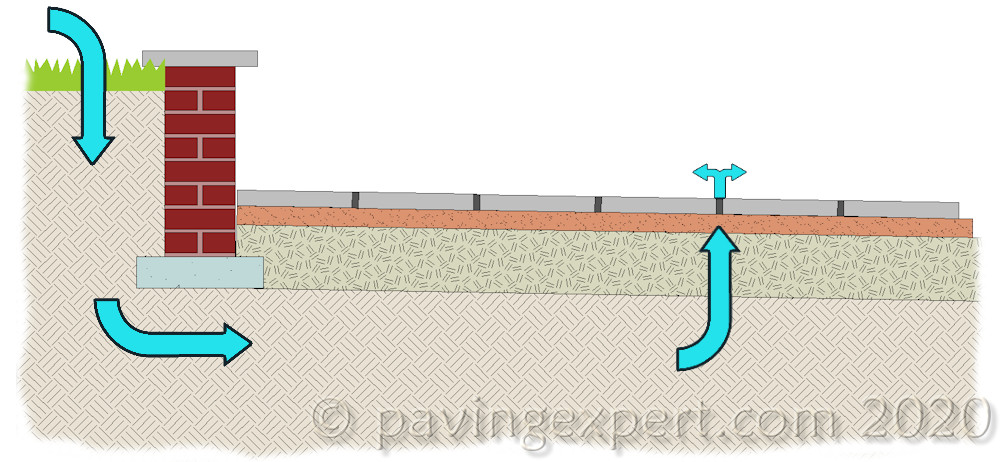
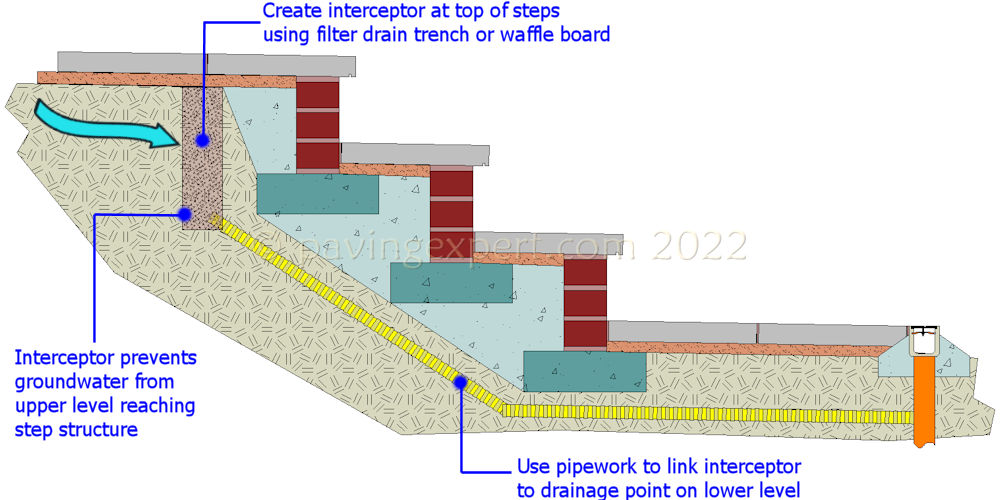
For the problem with steps shown above, the simplest fix is to install an interceptor across the full width of the steps at the upper level. This could be, for example, a filter drain of some form, or a strip of waffle board/drainage composite, or even a simple trench filled with clean gravel wrapped in a permeable geo-textile.
The aim is to intercept any groundwater before it reaches the step structure and then to direct it to a suitable outfall, which is most likely to be on the lower level. Using simple pipework (perforated or solid - it doesn't matter) the excess groundwater from the upper level "by-passes" the steps and is delivered to a point where it won't impact on any of the hard-landscaping, such as a linear channel drain, a gully, or a surface water inspection chamber.
The cross-section shows the pipe laid beneath the step structure, but it could be incorporated into the structure (using a solid pipe) or brought down one or both sides of the steps. The exact route of the connecting pipe from interceptor to outfall is not critical: all that matters is that the interceptor "isolates" the steps and thereby prevents groundwater entering the structure (as far as practical: there will be some groundwater that manages to sneak through), which in turn significantly reduces the risk of leachate being formed on the steps.
Getting rid of the stains:
Once the staining is apparent, there is no fix, or, at least, no simple surface fix. The problem is predominantly the bedding and the sub-base, and they are not easily replaced. Changing the jointing to a less permeable product *might* help a little but there can be no guarantee of that, and I know at least one job that spent a fortune cutting out a well-known one-part jointing medium and replacing it with a 4:1 cement mortar mix, only for the same problem to re-appear just three months later.
In the short term, the surface can usually be cleaned by scraping, and then a repeated attack with suitable cement removers. Most of the ‘scum’ is likely to be a variant of calcium carbonate or calcium sulphate, which while ‘hard’ are not as tough and resilient as a true cement, so can be chiselled, abraded and scraped away with patience.
However, care is required to avoid scratching or damaging the surface, and, if any acid-based cleaners are used to ease the removal, exceptional care is required to prevent staining or marking, particularly with imported sandstone or any limestone material (including travertine and marble).
Sadly, despite the best efforts at cleaning, the likelihood is that it *will* return.
In the longer term, the system often eventually clogs up completely and the source of the leachate effectively runs dry. This may take 12 months, or it can take 10 years. There are too many variables to consider to be able to offer a definite prediction.
Final thoughts:
The truly effective remedy (sub-surface drainage as shown above), as with so many of these problems, is far better if included as part of the original build because retroactive fitting can be costly, difficult or even impossible. In several cases, usually where a large proportion of the paving is heavily stained or contaminated, the only viable option has proven to be complete replacement of the entire pavement – paving, laying course, sub-base, the lot…..plus the installation of an effective interceptor drainage system.
For contractors looking to install paving in potentially vulnerable areas, they should consider just what it is they are using for the bedding, particularly the type of cement, which may not be suitable for the groundwater conditions on the local area. They should also consider installing some form of sub-surface drainage within the sub-base or at the interface between sub-base and bedding to drain away as much excess water as possible so that it doesn’t need to egress via the jointing at the lowest point on the pavement.