Introduction:
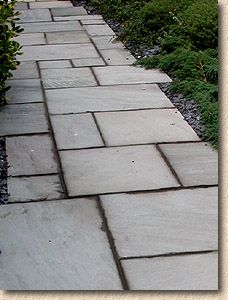
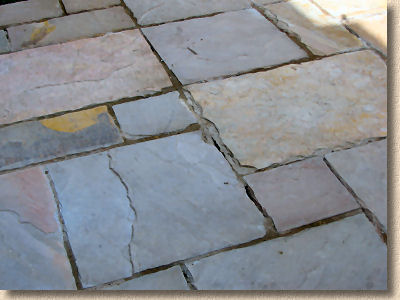
"Riven" refers to the surface of the flags, which is a natural bedding plane within the rock from which the flagstone was quarried. Riven surfaces tend to be uneven, reflecting the natural origin of the rock, and there is no set standard for what would be considered too uneven, or not uneven enough.
Stone flags come in a variety of forms, but, from a laying point of view, there are two categories - those flags that are sawn or specially worked to ensure a regular thickness, which we refer to as calibrated , and the more commonly encountered riven flags that come in variable thicknesses.
Thin or thick sliced?
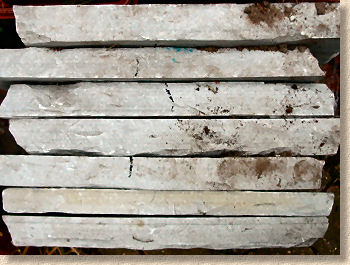
Much of the imported sandstone flags , and more or less all reclaimed stone flags come in varying thicknesses. Newly-quarried British/Irish stone and much of the imported stone is selected to be of "similar" thickness: for most residential purposes, this is 20-40mm, although stone flags for driveway and commercial use can be much thicker. The native-sourced stone for residential use tends to be slightly thicker (generally 40-55mm) than the imported stone, which aims for greater economy, and is usually somewhat thinner, around 20-40mm.
Reclaimed flags, because they tend to come from a number of different sources, can vary in thickness quite considerably, being anything from a worryingly-thin 30mm to a back-breaking 150mm! This degree of 'tolerance' in flag thickness means that any individual flag can easily be twice as thick as its neighbour.
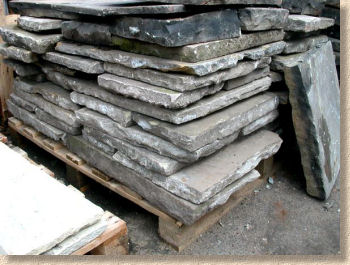
This variation in thickness means that, when it comes to laying riven stone flags, screed bedding is not feasible, and we have to rely on individual bedding . The remainder of this page considers this method.
Which way is up?
Reclaimed Stone
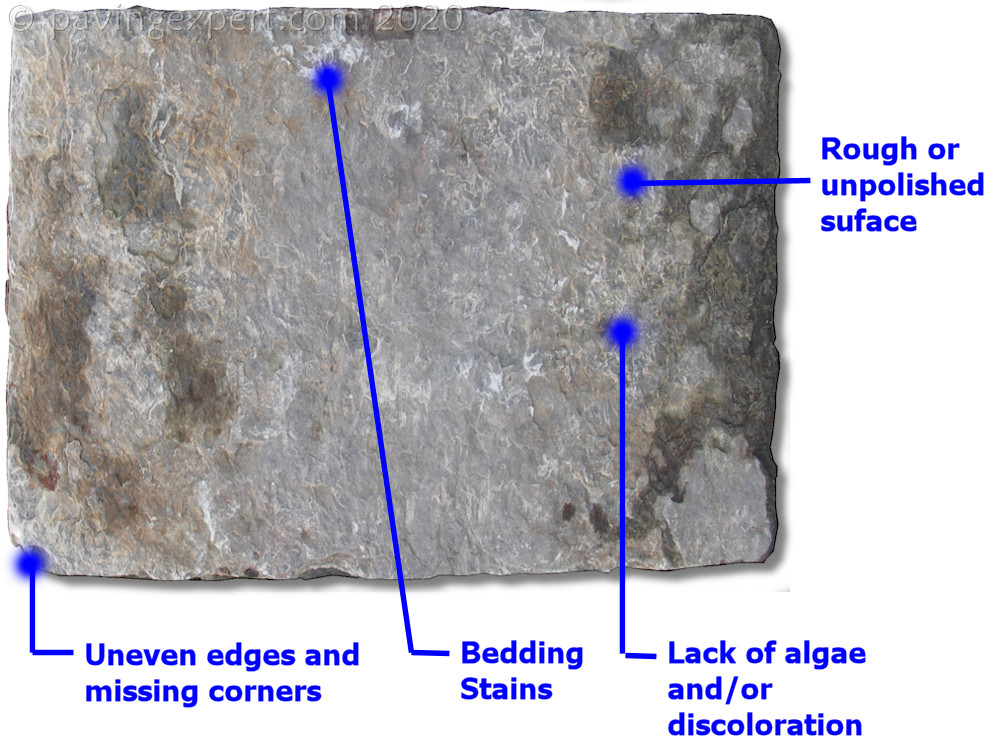
With reclaimed stone, identifying the top surface is usually pretty straightforward - it has a worn, polished, smoother surface, possibly with the odd stain or dollop of chewing gum to make it even more obvious. The edges tend to be rounded through years of foot traffic, and the colour is usually darkened with grime, algae or general wear and tear. Examination of the underside may show marks or stains from the previous bedding materials, along with a much coarser, unpolished texture and the unmistakable rough-and-ready edges.
New/Imported stone
On newly-quarried stone, other than the sawn or textured products, the top surface can be less obvious to those not familiar with paving stone, as both top and underside are equally clean and equally riven. Thankfully, there are a couple of pretty obvious visual clues that help distinguish just which is the right way up.
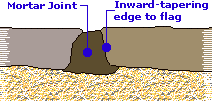
Firstly, the top surface should always have, neat, square edges. These are usually hand-trimmed, and are known as 'fettled', which refers to the slightly-less-than-perfect nature of the edges, emphasising the natural origin of the stone and distinguishing it from the dead-straight, machine cut or moulded accuracy of manufactured products. Conversely, the underside has untidy, poorly-defined edges, as can be seen in these photographs.

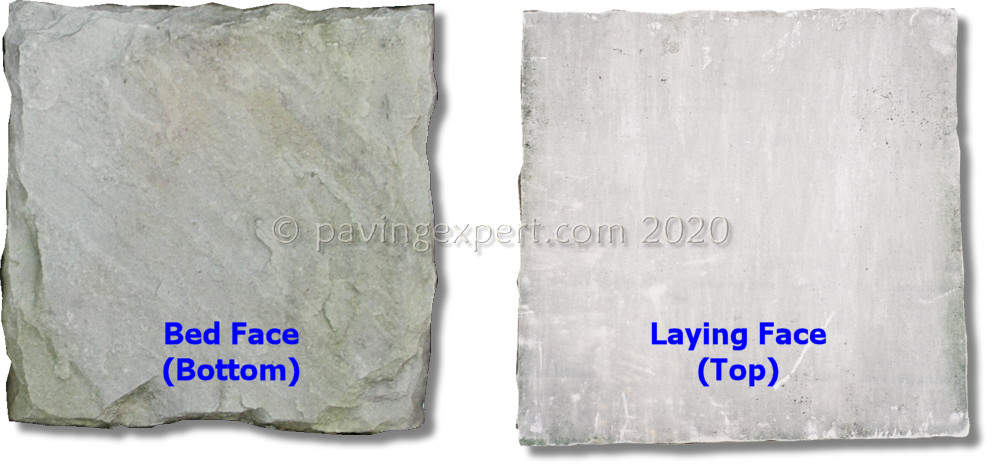
Secondly, the sides of the flags are usually tapered inwards, so that the top surface of the flag is slightly larger than the underside. This helps ensure accurate fitting, allowing joints to maintained at a standard width, and also ensures that any mortar jointing is firmly held in place.

With flagstones that have been calibrated , you'd think it would be glaringly obvious which way is up: the strip-milling marks make it as clear as possible which is the face and which is the base, but some folk *still* get it wrong!
To be fair, we have heard several stories of customers, DIYers and even so-called contractors laying claibrated flagstones the wrong way up deliberately because, allegedly, they prefer that look!
There really is nowt so queer as folk!

Can flagstones be laid upside down? FAQ - Laying Flags Upside Down
Getting on with it...
Working to plan
Once the top surface has been identified, laying can proceed. When working with modular paving, the usefulness of a plan cannot be over-emphasised: it saves an enormous amount of head-scratching, trying to figure out which flag goes where, and whether it's one of those or one of the others to be laid next. Plans for Random Layouts are indispensible, but pre-planning is also a good idea when laying in courses, or even to a regular pattern, as it helps the flag-layer identify just where they are up to.
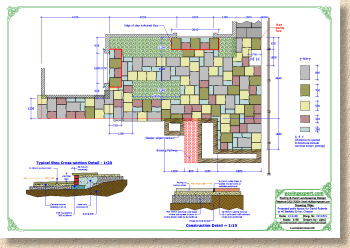
Random (or patterned/coursed) layout designs are available to order - see this page for more information
Preparation
What follows assumes that the area being paved is a simple patio or other light-use area. For areas that will be trafficked by vehicles, use of a thicker bed using mortar and/or concrete, plus the use of a sub-base is to be recommended. If using flags of less than 60mm thickness for a driveway, a full concrete bed (CBM4) is the best solution, combining sub-base and bedding in one, but for thicker flags, a 100-150mm granular sub-base and a cement-bound bedding material is often satisfactory.
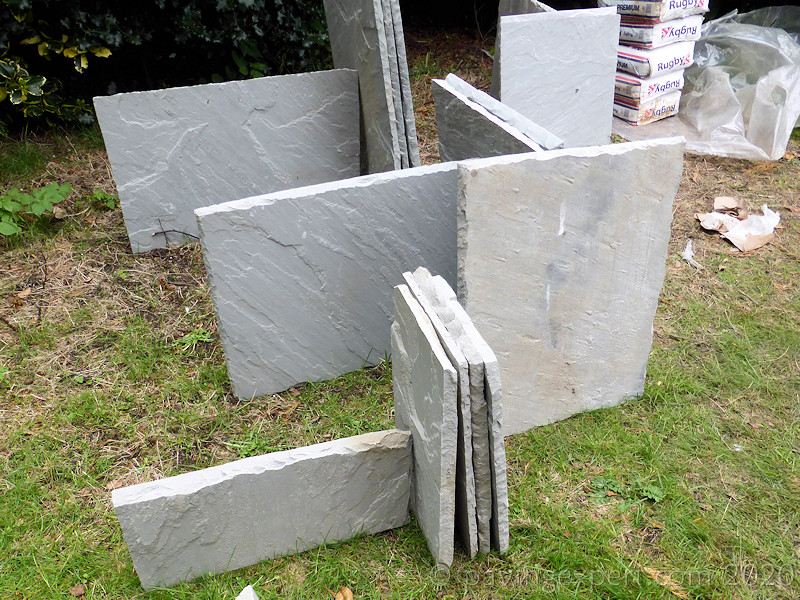
The materials should be brought into the working area, and stockpiled so that they are easily accessible but not in the way. The flags themselves should be stacked just outside the working area, with the different sizes stacked in separate piles.
Note that stacking flags as shown opposite, with one flag on edge supporting a stack of other flags at 90° is DANGEROUS and should not be done. We've all seen flags stacked this way on site, but it only takes some eejit to accidentally knock the support flag, and the whole lot fall over, potentially causing serious injury. Several years ago, a small girl playing on a building site 'after hours' was crushed to death when she (or her playmates) bumped into the support flag and a stack of heavy, concrete 3x2s (as they were back then) collapsed on top of her. Don't take risks!
Bond Bridge (Slurry Primer)
Increasingly, contractors and DIYers are using this technique to ensure the paving adheres to the bedding and does not come loose. It relies on using a chemically-enhanced cementitious goo daubed on the underside of the flags to literally glue the flags to the bed.
The hows, whys and whats of using a bond bridge (or slurry primer if you prefer that phrase) are considered on a separate page .
Bedding and Buttering
In the cast majority of applications, riven flagstones for patios and driveways should be laid on a bound (mortar) bed . There are very, very few exceptions to this.
Coverage rate for bedding material is approx. 10-12 m² per tonne at 50mm thick, but this varies with moisture content. See Screeding page or the Aggregates page for more details on grit sands.
Use this calculator to work out how much sand or bedding mix is needed to lay a typical patio or pavement.
The bedding material can be mixed elsewhere and brought into the working area in a barrow, or it can be mixed 'in-situ' and distributed as required. Mortar for buttering and pointing is best mixed in advance, and stored in a barrow from which it can be taken as needed.
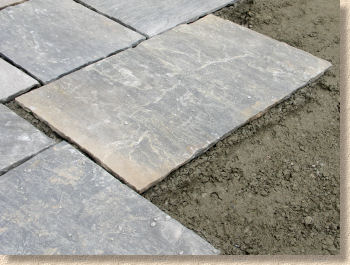
The flag to be laid is checked and its thickness ascertained. The bedding material is spread over an area at least 100-150mm larger than the next flag to be laid, and levelled out with a spade or a trowel to a depth that will accommodate the flag and allow it to be compacted down to the correct level.
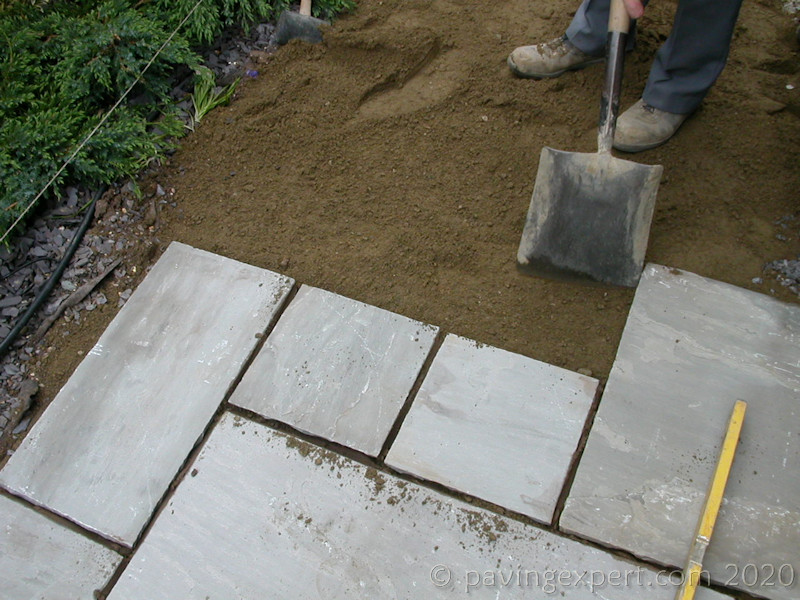
Ideally, the bedding should be 25-50mm thick. Less than 25mm renders it almost impossible to settle the flag, while more than 50mm makes for uncertain compaction. Adjust the level of the sub-layers rather than use less than 25mm or more than 50mm of bedding.
The depth of the uncompacted bedding below the surface layer varies with type of bedding, thickness of bedding, thickness of flag, moisture content (and quite probably which day of the week it is!) so it's not possible to give exact figures for how much a bed will consolidate, but, in general, the flag should be 5-10mm 'proud' when first laid onto the bedding, ie, before it is tapped down to level.
If a bond bridge slurry primer is being used, it should be applied to the underside of the flag immediately before placing the flag onto the prepared bed.
When using mortar joints, the receiving edges of the previous flags are ' buttered ' with the jointing mortar, and the flag is placed into position, as shown on the Laying Flags page. Other jointing options are considered on the Flag Laying Basics page.
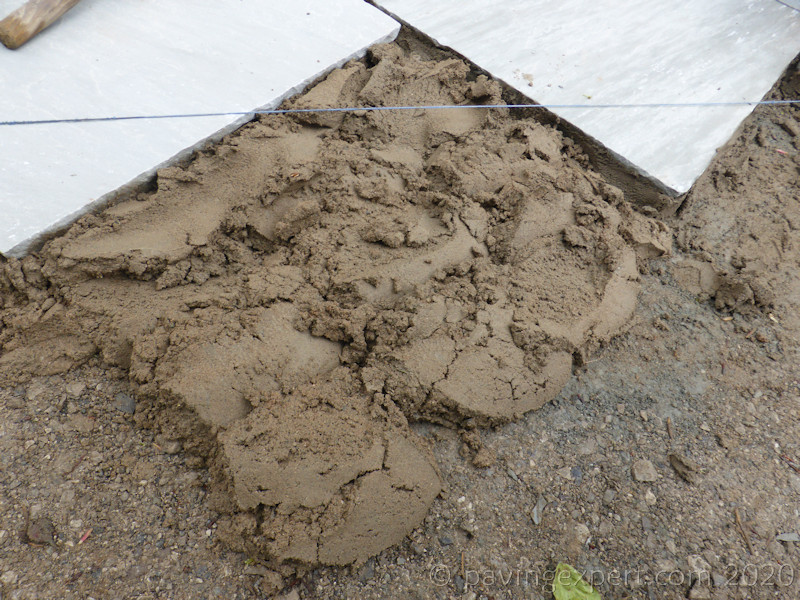
Spot bedding - don't do it!
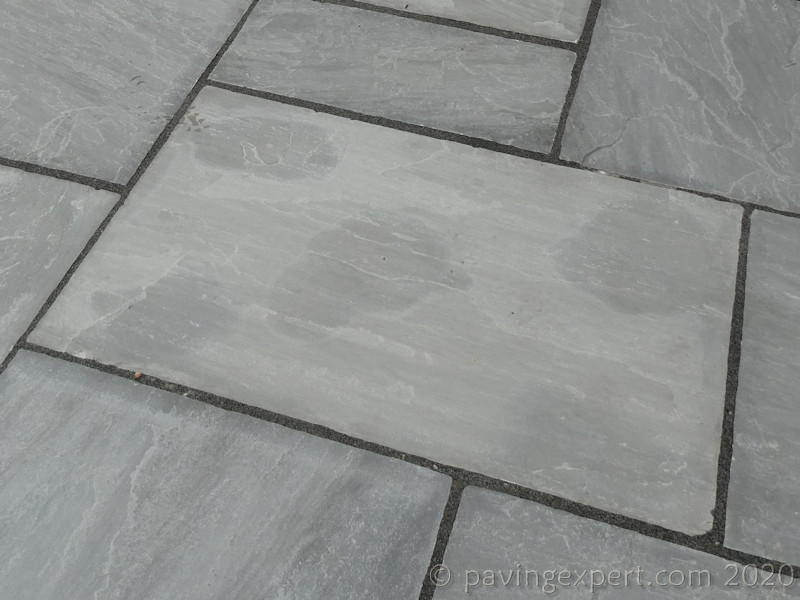
The multitudinous reasons why the heinous crime known as 'spot bedding' or 'dots' or 'dabs' is never, ever used by professional contractors is covered elsewhere on this website . However, if the reasons explained on that page aren't enough to convince the non-believer that spot bedding is the methodology of rogues, buffoons and charlatans, its manifest failings when used with some of the more porous imported flagstones should be obvious from the photo below.
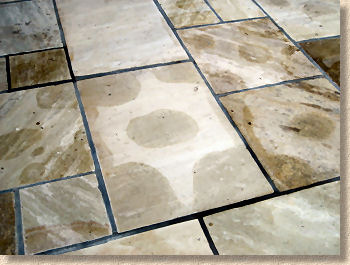
Many of the imported sandstones, and some of the limestones and granites, are very porous and when laid onto wet (high slump ) mortar spots, the stone acts as a wick for the moisture content, drawing it up from the mortar towards the flagstone surface. Even worse, cement particles can be carried upwards by the water and left on the surface as the water evaporates, creating a more-or-less permanent stain.
Flagstones laid on a full bed of semi-dry or moist mortar tend not to suffer from this problem anywhere near as much. There is less moisture present to be wicked to the surface, and even if some wicking does take place due to extreme porosity of the stone and/or high ambient temperatures, the *whole* of the flag is supported by the mortar bed, so there is no evidence on the surface of the paving equivalent of a VPL (Visible Pantie Line, as the ladies refer to it).
For flagstones where a semi-dry (low slump) bed would cause problems of adhesion, a Bond Bridge can be used to ensure full and proper bonding of the flagstone to the laying course. For very pale-coloured stone, many suppliers are now recommending the use of a laying course prepared using silver sand (no iron colouring) and a white cement to minimise the risk of taints being carried to the surface from damp or moist bedding.
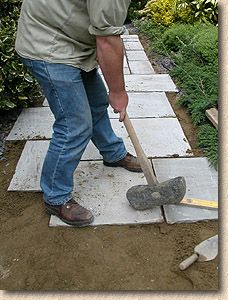
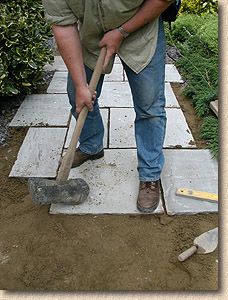
Consolidating
Once in position, the flag should be consolidated. This is best done with a Pavior's Maul (as shown below), but, when laying on a full mortar bed (rather than a semi-dry bedding mix) smaller flags can be tapped down using a small rubber mallet .
A spirit level can be used to check for level and alignment. Take care not to stain the surface of the flags with the bedding material - always ensure the 'face' of the mallet is clean.


Stop the rock
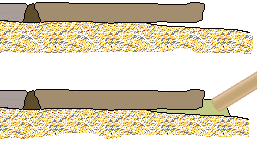
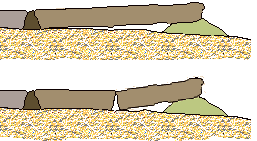
Once consolidated, the flag should be checked for 'rocking'. With larger flags (600x600 or bigger) this can be done by straddling the flag diagonally, and shifting ones weight to check for any movement, before switching to the other diagonal and checking again.
Any slight movement during the 'rocking test' can sometimes be eliminated by packing the low corner of the flag with additional bedding material, which is rammed in using the shaft of the mall. However, any significant movement, more than 3mm or so, will need the flag to be lifted and the bedding adjusted, either by addition or removal of bedding material.
Remember, regardless of which bedding material is being used, the aim is a "Full Bed", that is one that supports every part of the flag. Excessive packing of one corner, or 'hollowing-out' the centre of the bed to ease consolidation, results in voids beneath the flag, which can lead to all sorts of problems, not least of which is flag breakage. This is bad practice and should be avoided at all times.
Checking Level
Once satisfied that the flag is firm, the level should be checked against the guide line and/or with a spirit level.
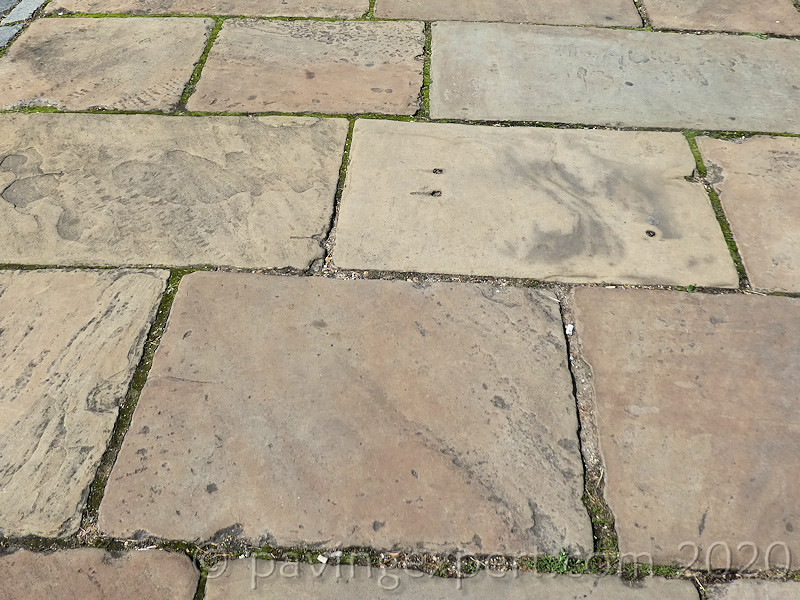
It's never easy to check riven flags for level accuracy, as the uneven surface never gives the same reading twice. This is why it's so important to continually check the work with a long straight-edged timber, which spans 3 or 4 flags at a time, and gives a good indication of overall level accuracy. Some parts or the flags might be slightly low, and some will be slightly proud, but, the overall appearance should be that the flags are more-or-less level with their neighbours, that there are no lips between adjacent flags, that the flags tie-in with the required level, and the fall is correct.

Creating regular joint widths
Many riven flagstones and their concrete counterparts exhibit a problem regarding even, regular joint widths when laid to random layouts. While this problem does not always occur, it is sufficiently complex to warrant a page of its own.
For projects where a regular joint width is required, the use of paving spacers is probably the best option.
On projects where joint width is irregular or causing a problem with the finished look, the Regulating Joint Width page offers a simple solution.
Finishing Off
When a suitable area has been laid, checked for solidity and level compliance, and any problems with joint width satisfactorily resolved, then the surface can be brushed off to remove any surplus bedding and/or mortar snots (Yes! They are really called that!). Pointing with mortar is best done immediately, while the butter mortar is still relatively fresh and plastic, so that it all sets as one. However, if pointing cannot be completed there and then, it should be done at the first available opportunity.
Alternative jointing methods are considered on other pages. It's worth noting that the use of good quality polymeric mortars is an increasingly popular choice for jointing imported flagstones for patios and pathways and there are also stronger resin mortars suitable for driveway projects. These materials are well worth considering if there is any doubt at all regarding cement mortar skills.
And that's about it! Try to keep foot traffic off the paving for 24 hours, while the bedding begins to set and the jointing mortar has a chance to begin its curing process. After 3-7 days, it should be fine for regular foot traffic, or even light vehicular traffic, as long as the pavement has been designed as a driveway or vehicle over-run area.